
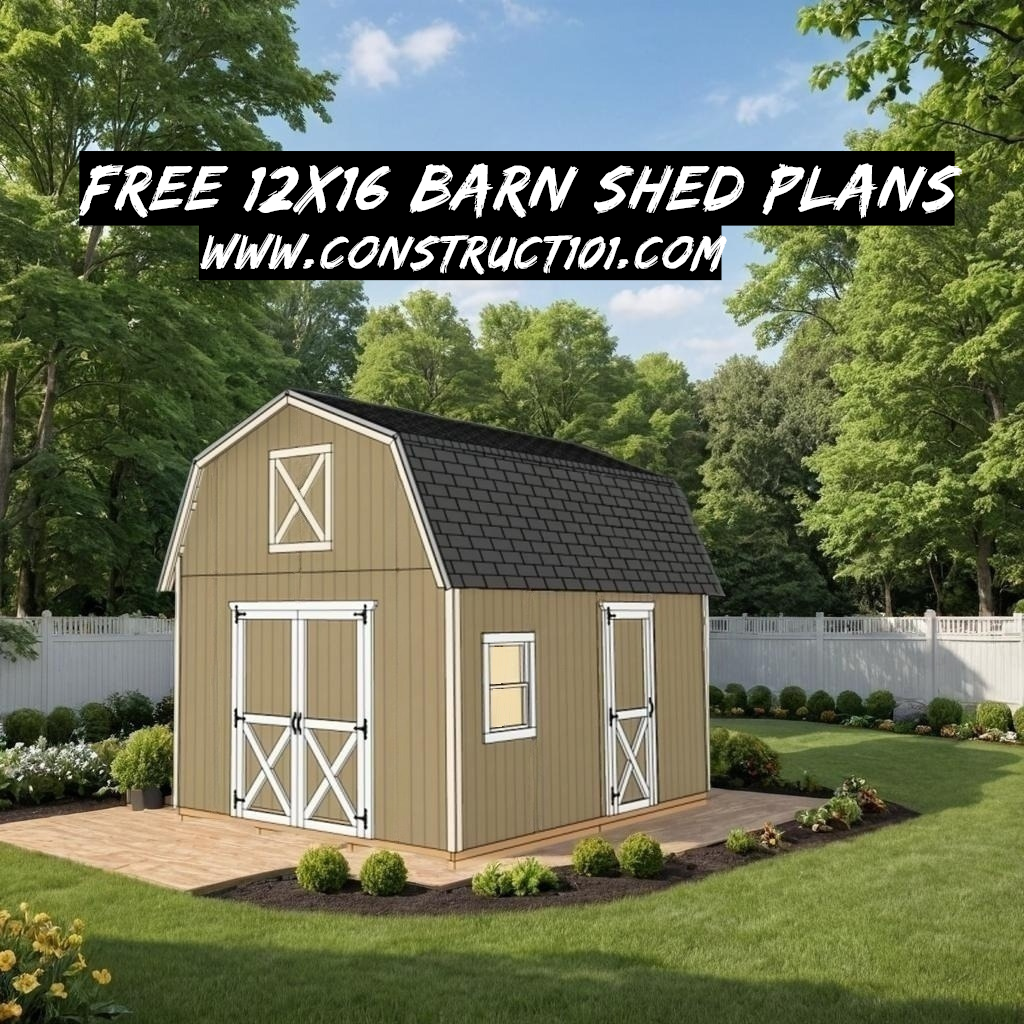
12×16 barn shed plans, this DIY project includes a PDF download (link at bottom of post).
Plans include drawings, measurements, cutting list, and shopping list.
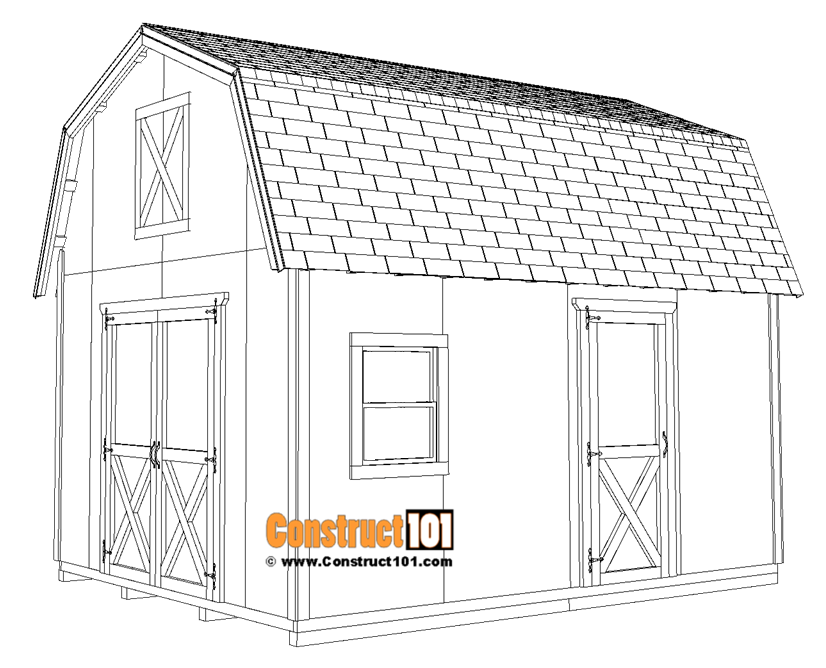
Overview
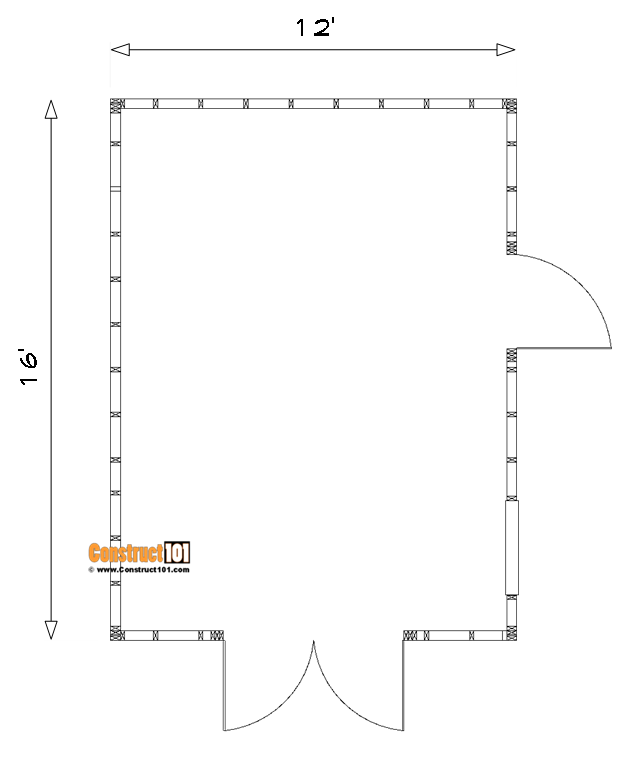
Floor View
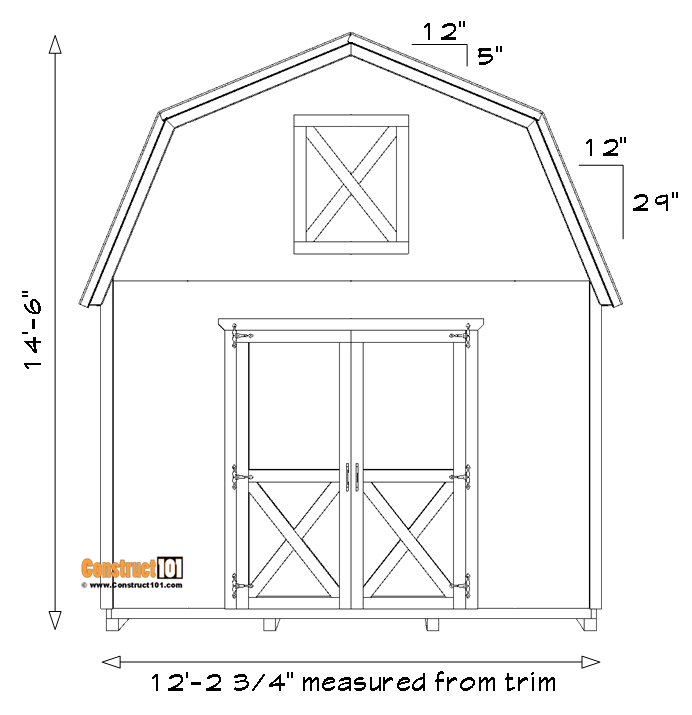
Front View
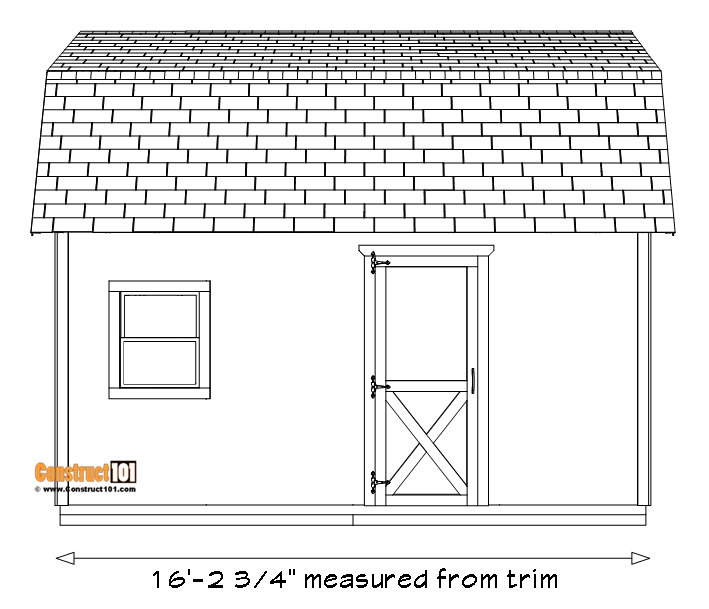
Side View
12×16 Barn Shed Plans – Material List
Shopping List
Since lumber can be purchased in different sizes the shopping list will vary.
Study the cut list to see what will work best for you.
(material for door/window not included)
| Part# | Qty. | Disc. | Size |
| floor | 8 | 4×4 (pressure treated) | 8 ft. |
| floor | 2 | 2×6 (pressure treated) | 16 ft. |
| floor | 13 | 2×6 (pressure treated) | 12 ft. |
| floor | 6 | tongue and groove plywood | 3/4 in. x 4 ft. x 8 ft. |
| walls | 6 | 2×4 | 16 ft. |
| walls | 54 | 2×4 | 8 ft. |
| walls | 6 | 2×4 | 12 ft. |
| rafters/truss | 30 | 2×6 | 10 ft |
| rafters/truss | 1 | plywood | 1/2 in. x 4 ft. x 8 ft. |
| rafters/truss | 14 | 2×4 | 8 ft. |
| siding | 20 | t1-11 exterior siding | 4 ft. x 8 ft. |
| roof | 8 | 2×4 | 8 ft. |
| roof | 11 | plywood | 1/2 in. x 4 ft. 8 ft. |
| door | see shed door/window | ||
| trim | 6 | 1×4 | 8 ft. |
| trim | 4 | 1×4 | 10 ft. |
| hardware | galvanized nails | 3 1/2 in. | |
| hardware | galvanized nails | 2 in. | |
| hardware | deck screws | 2 in. | |
| hardware | galvanized finishing nails | 2 in. | |
| hardware | shingles | ||
| hardware | roofing felt | ||
| hardware | drip edge | ||
| hardware | z flashing | ||
| hardware | roof tacks | ||
| hardware | roofing staples |
Cutting List
(material for door/window not included)
| Part# | Qty. | Disc. | Size |
| floor | 8 | 4×4 (pressure treated) | 8 ft. |
| floor | 2 | 2×6 (pressure treated) | 16 ft. |
| floor | 13 | 2×6 (pressure treated) | 11 ft. 9 in. |
| floor | 6 | tongue and groove plywood | 3/4 in. x 4 ft. x 8 ft. |
| walls | 4 | 2×4 | 16 ft. |
| walls | 2 | 2×4 | 15 ft. 5 in. |
| walls | 54 | 2×4 | 7 ft. 6 in. |
| walls | 4 | 2×4 | 11 ft. 5 in. |
| walls | 2 | 2×4 | 12 ft. |
| rafters/truss | 60 | 2×6 | 59 5/8 in. (22.5-degree angle cuts on both ends) |
| rafters/truss | 1 | plywood | 1/2 in. x 4 ft. x 8 ft. (cut to size) |
| rafters/truss | 14 | 2×4 | 8 ft, (cut to size) |
| siding | 20 | t1-11 exterior siding | 4 ft. x 8 ft. |
| roof | 16 | 2×4 | 21 3/4 in. |
| roof | 4 | 2×4 | 8 ft. (cut to size) |
| roof | 11 | plywood | 1/2 in. x 4 ft. 8 ft. |
| door | see shed door/window | ||
| trim | 6 | 1×4 | 8 ft. (cut to size) |
| trim | 4 | 1×4 | 10 ft. (cut to size) |
FLOOR
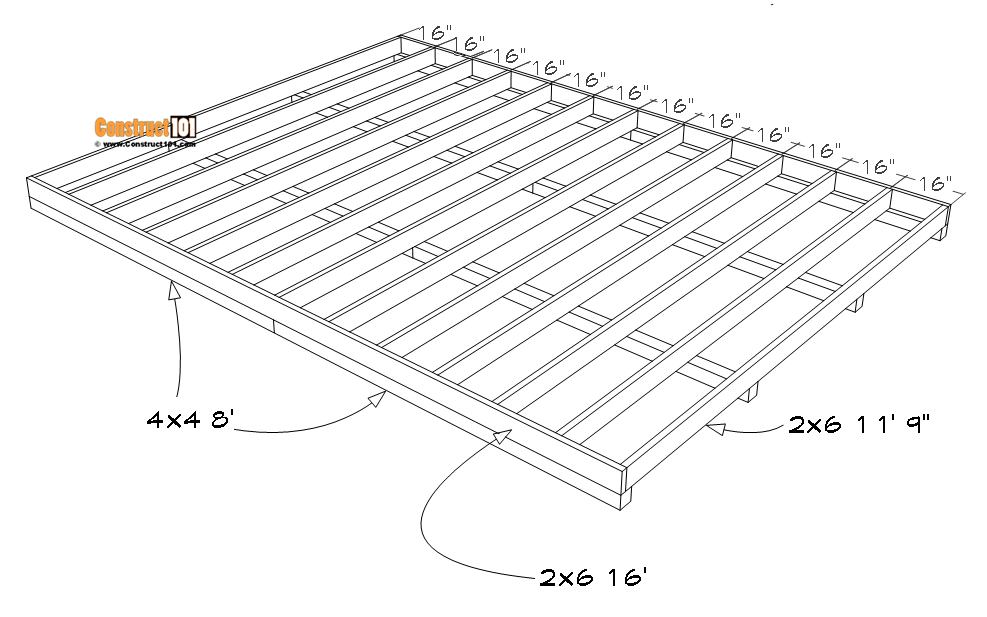
- 8 – 4×4 (pressure treated) – 8 ft.
- 2 – 2×6 (pressure treated) – 16 ft.
- 13 – 2×6 (pressure treated) 11 ft. 9in.
Assemble as shown on drawing, use 3 1/2 in. nails to assemble.
Nail through the band and into the joist.
Joist are spaced out 16 in. on center.
Toenail through frame and into the skids.
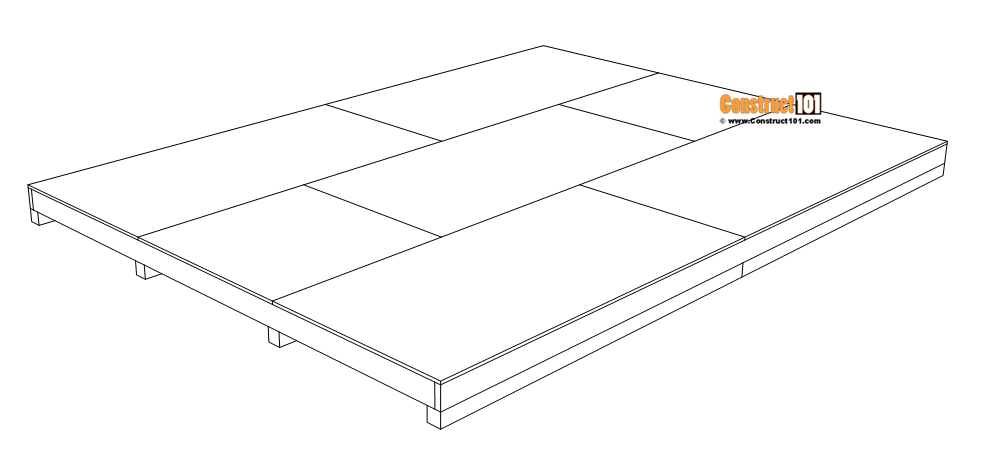
- 6 – tongue and groove plywood – 3/4 in. x 4 ft. x 8 ft.
Measure and cut the plywood to size as shown on drawing.
Install to floor frame using 2 in. deck screws.
WALLS
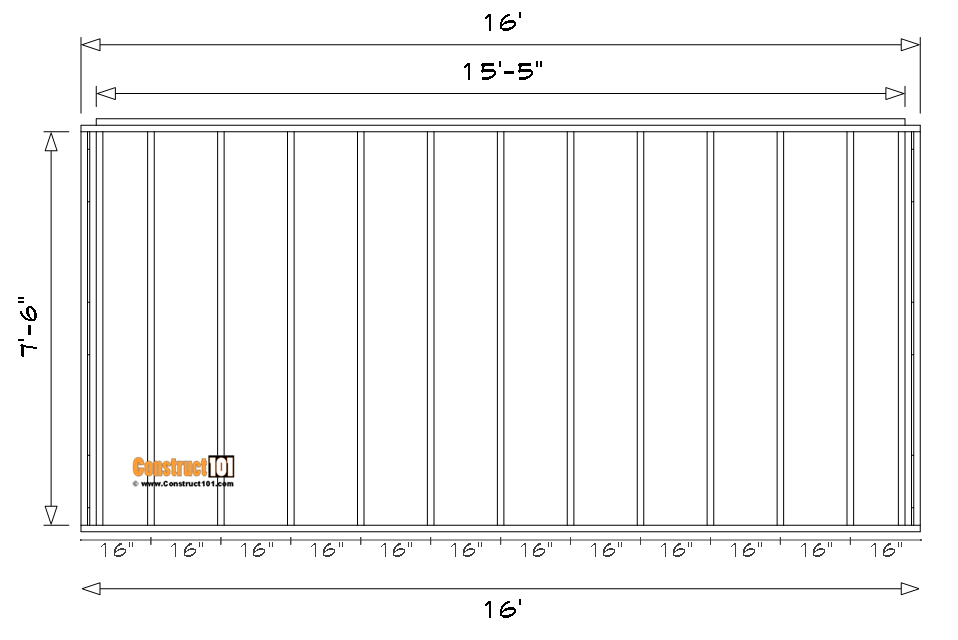
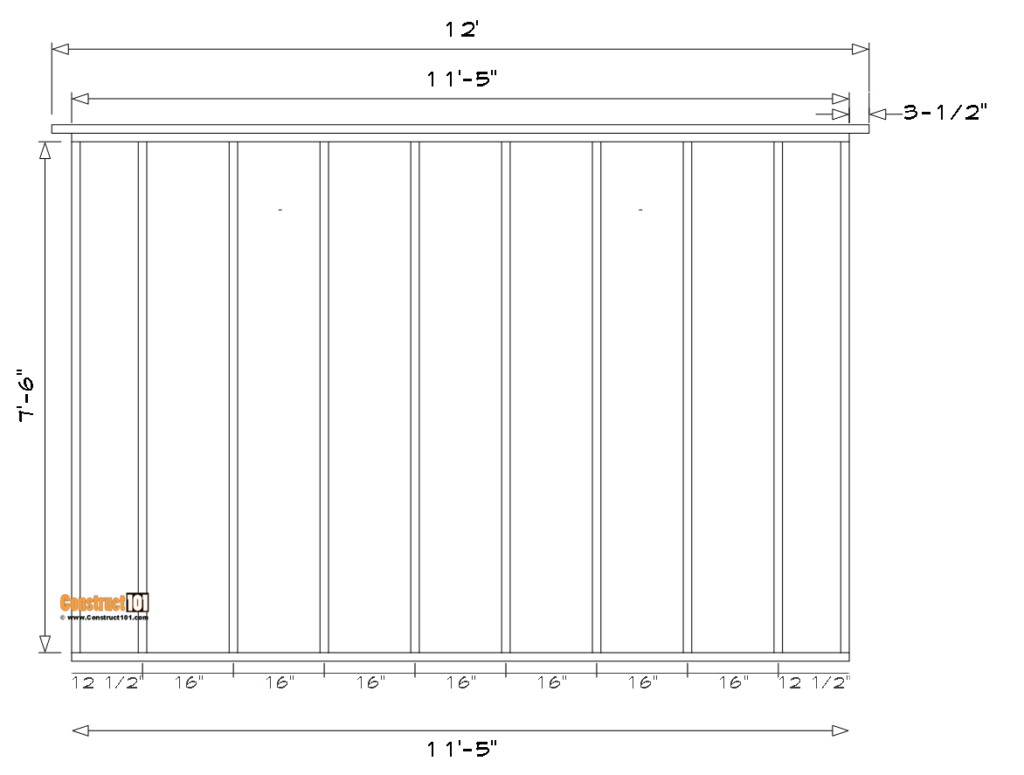
Wall Frame – Sides
- 4 – 2×4 – 16 ft.
- 2 – 2×4 – 15 ft. 5 in.
- 34 – 2×4 – 7 ft. 6 in.
Assemble both side wall frames as shown on drawing using 3 1/2 in. nails.
Wall studs are 16 in. on center.
If you are installing a door and window to the side walls see door/window for framing details.
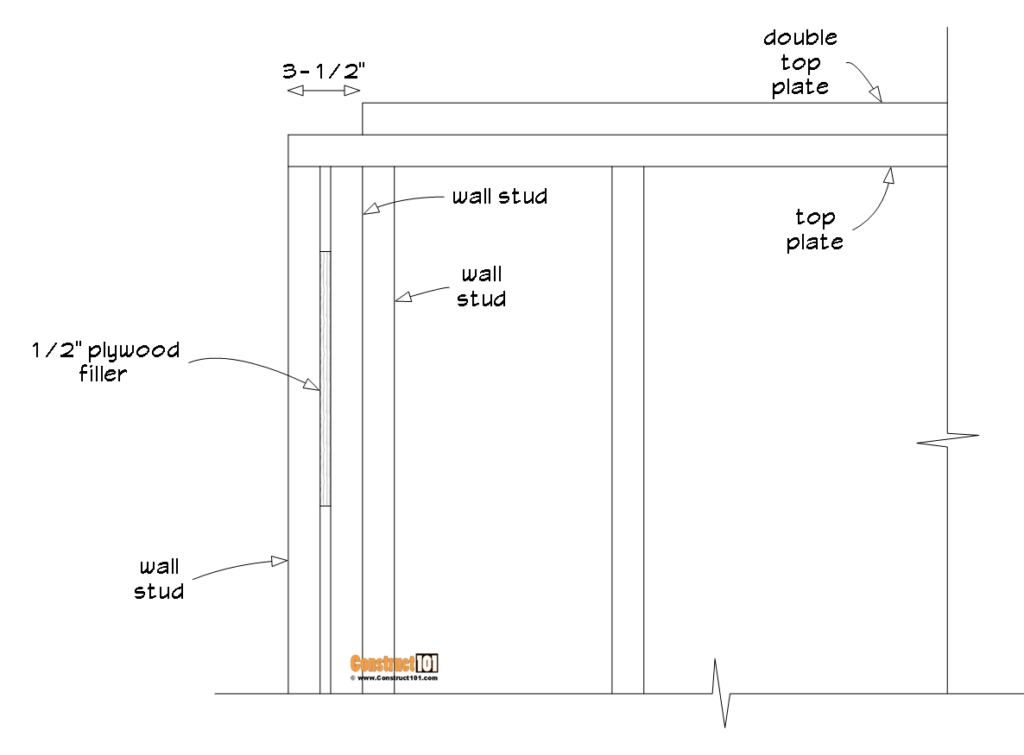
Side wall frame close up view of the ends.
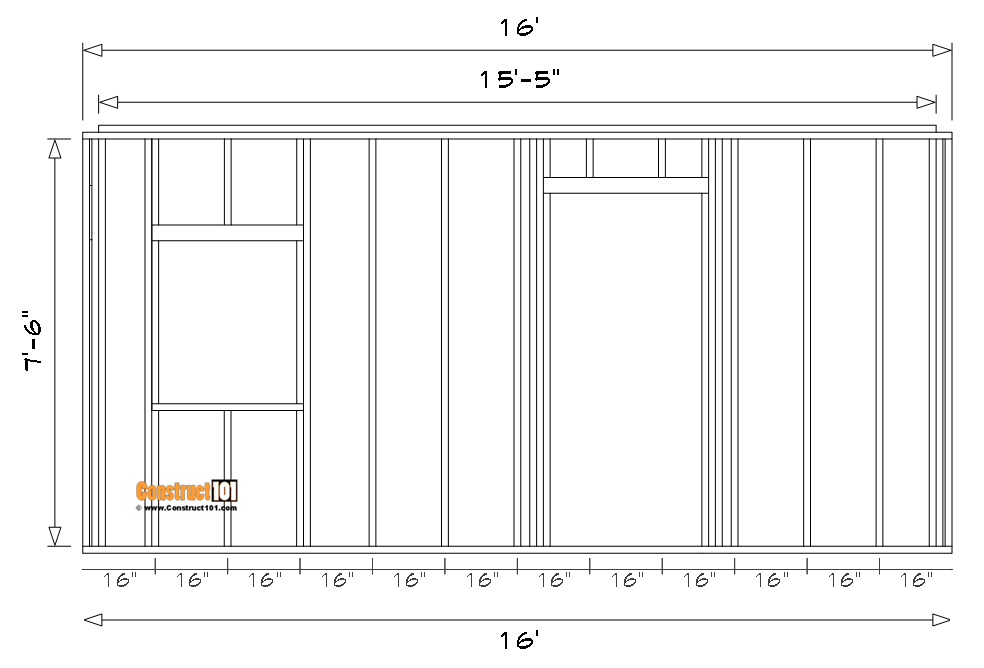
Wall Frame – Front and Back
- 4 – 2×4 – 11 ft. 5 in.
- 2 – 2×4 – 12 ft.
- 20 – 2×4 – 7 ft. 6 in.
Assemble the front and back wall frames as shown on drawing using 3 1/2 in. nails.
Wall studs are 16 in. on center.
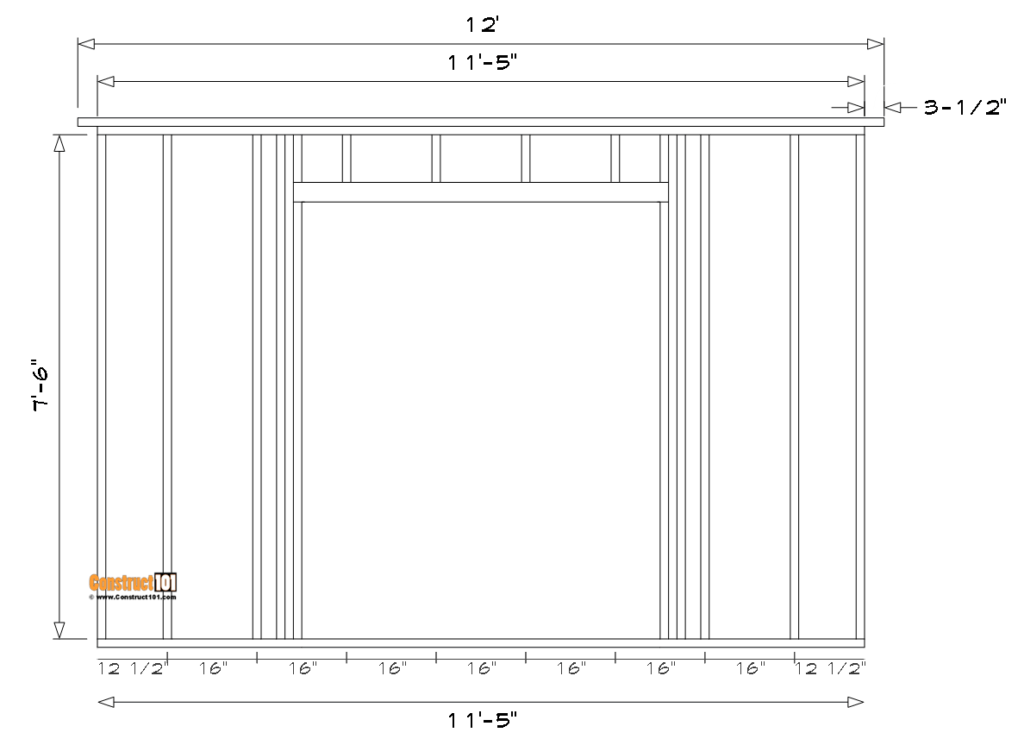
If you are installing a door and window to the front or back walls see door/window for framing details.
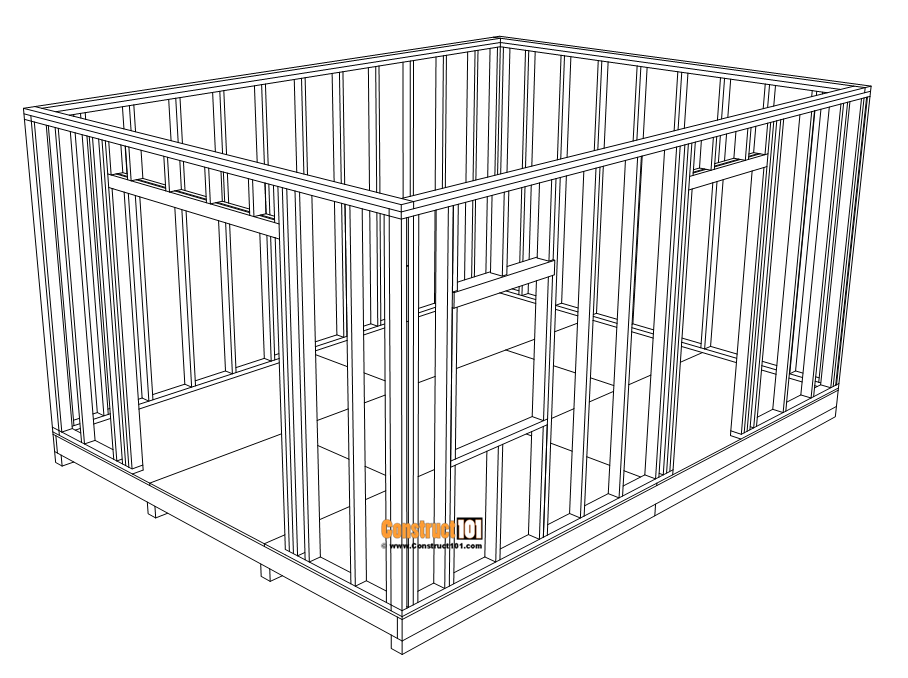
Nail wall frames into the floor and adjacent wall frames using 3 1/2 in. nails.
Do not nail on bottom plate door opening, plate on door opening will be cut and removed.
RAFTERS/TRUSS
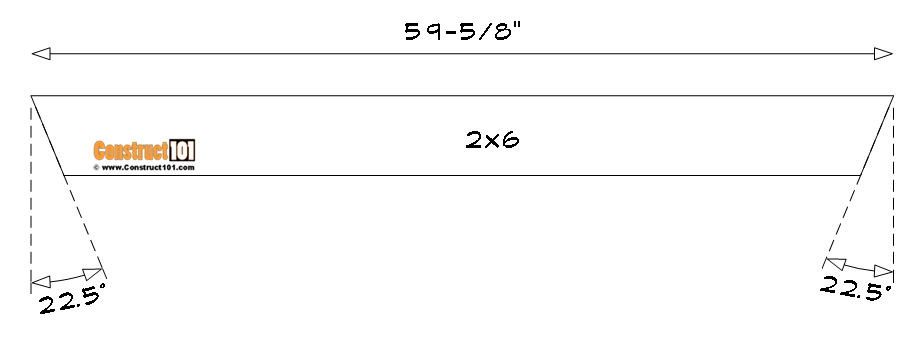
- 60 – 2×6 – 59 5/8 in. (22.5-degree angle cuts on both ends)
Cut the 2×6 rafters to size as shown on drawing.
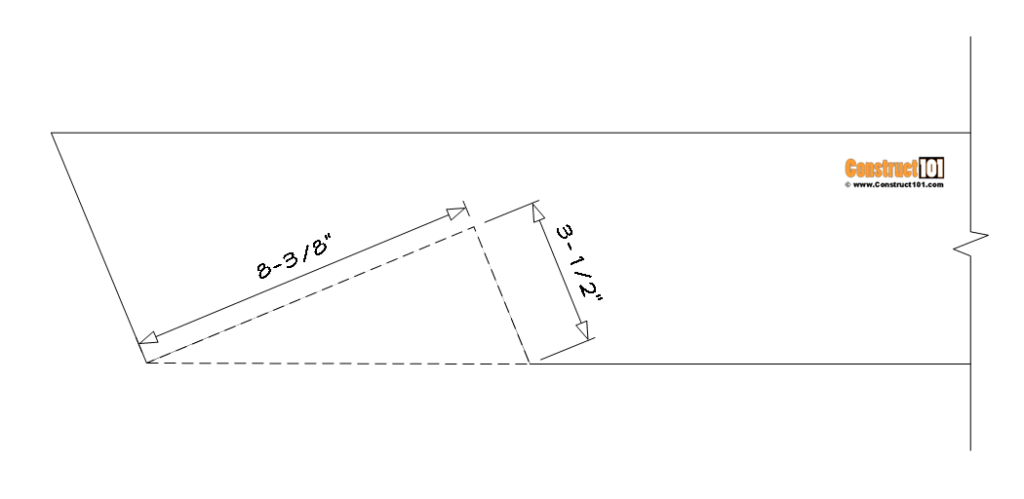
Using a framing square, measure and cut the birds mouth as shown on drawing on 26 of the rafters.
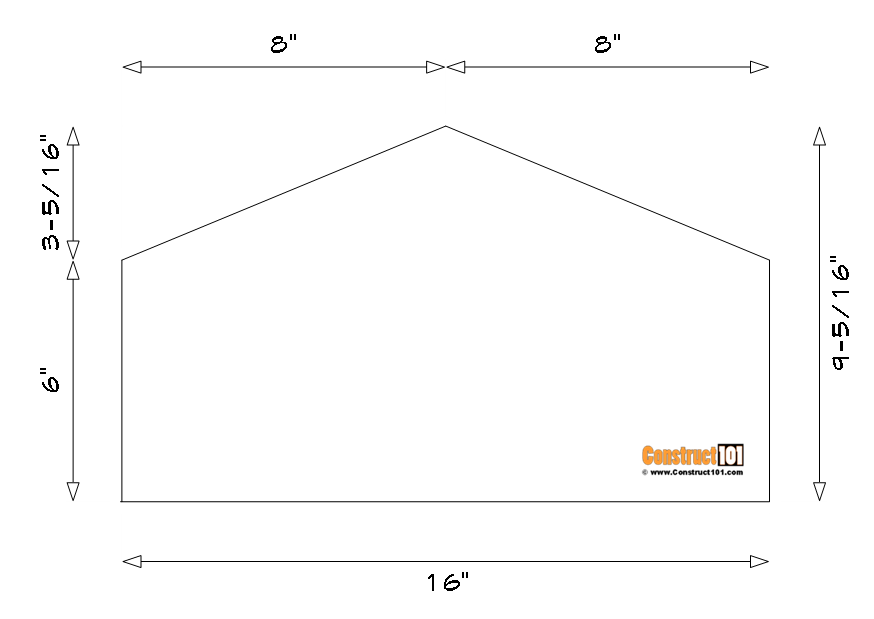
- 1 – plywood – 1/2 in. x 4 ft. x 8 ft.
Use 1/2 in. plywood to make gussets.
Cut gussets as shown on drawing.
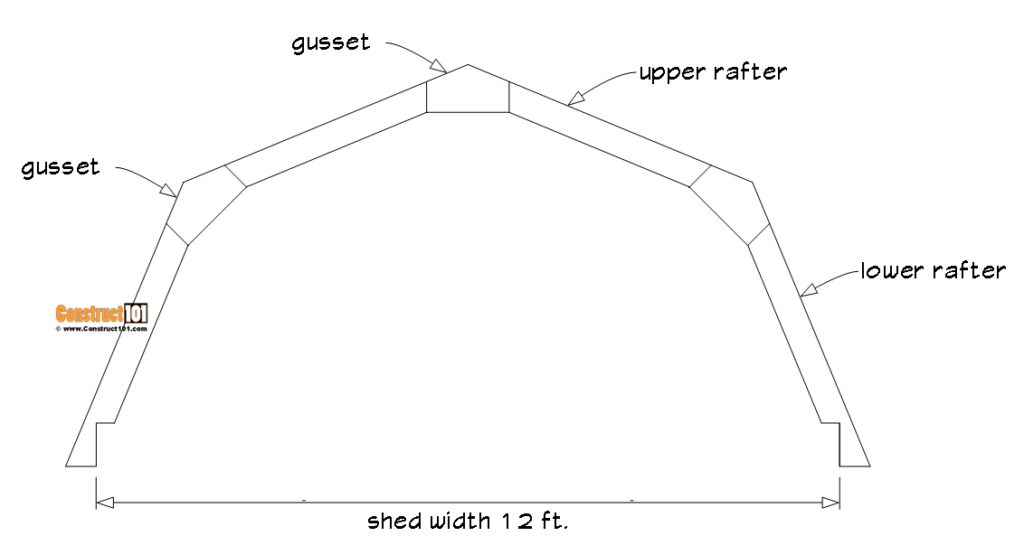
Assemble the roof truss as shown on drawing using 2 in. deck screws.
Screw through the gusset and into the rafters.
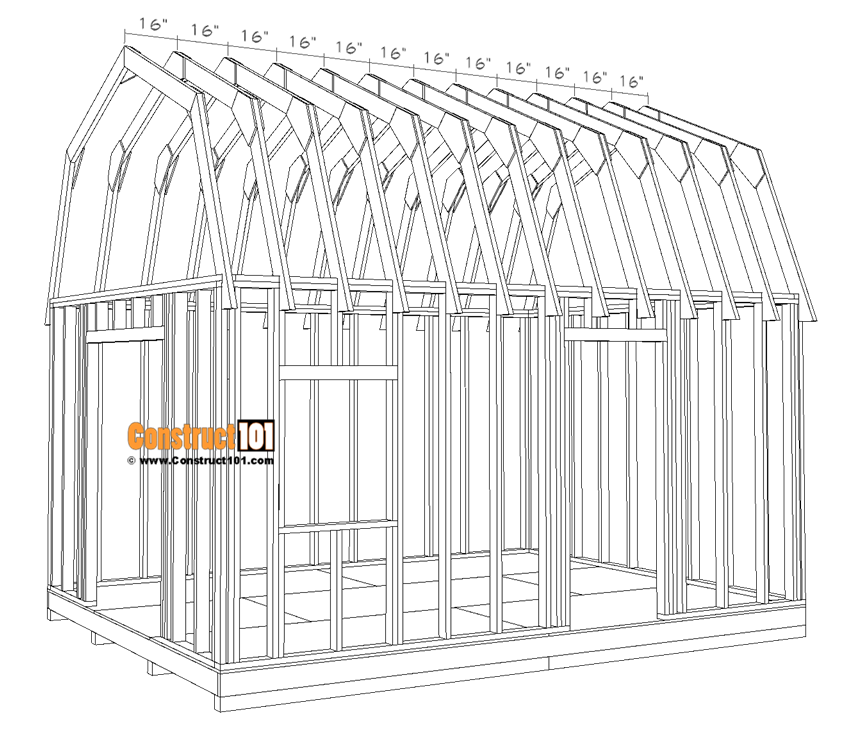
Install roof truss as shown on drawing.
Roof truss is spaced out 16 in. on center.
Install using 3 1/2 in. nails.
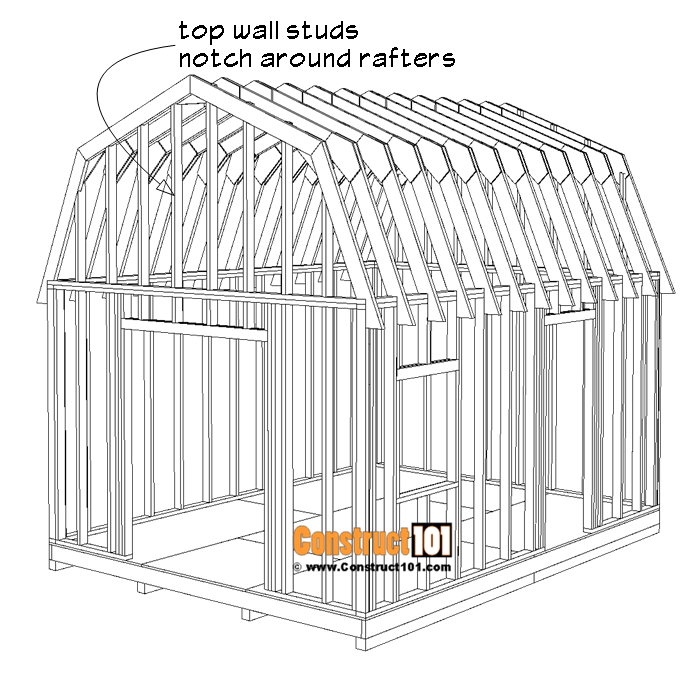
- 14 – 2×4 – 8 ft.
Measure and cut 2×4’s to size and install to the front and back top wall frame.
Notch the top end of the 2×4’s around rafters.
SIDING
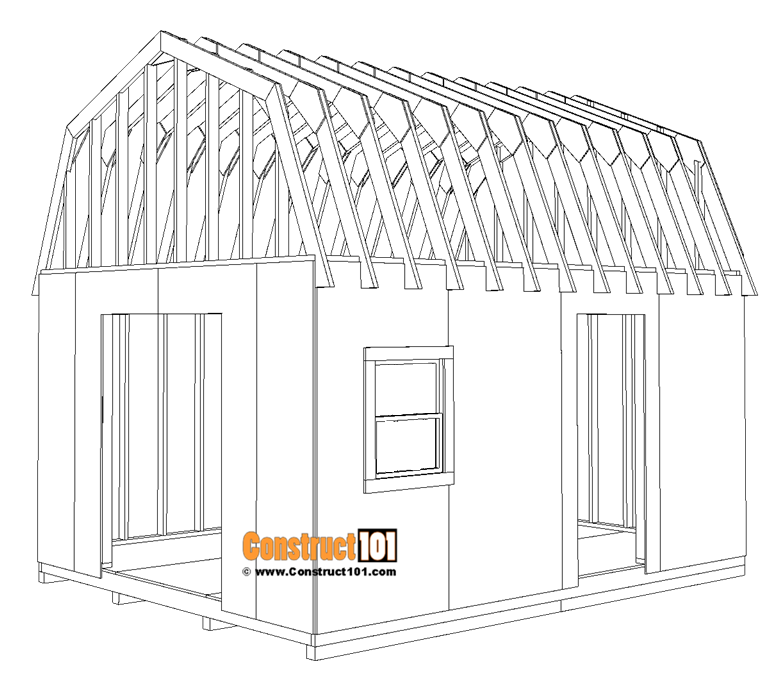
- 20 – t1 11 exterior siding – 4 ft. x 8 ft.
Install siding using 2 in. finishing nails.
Notch siding around rafters.
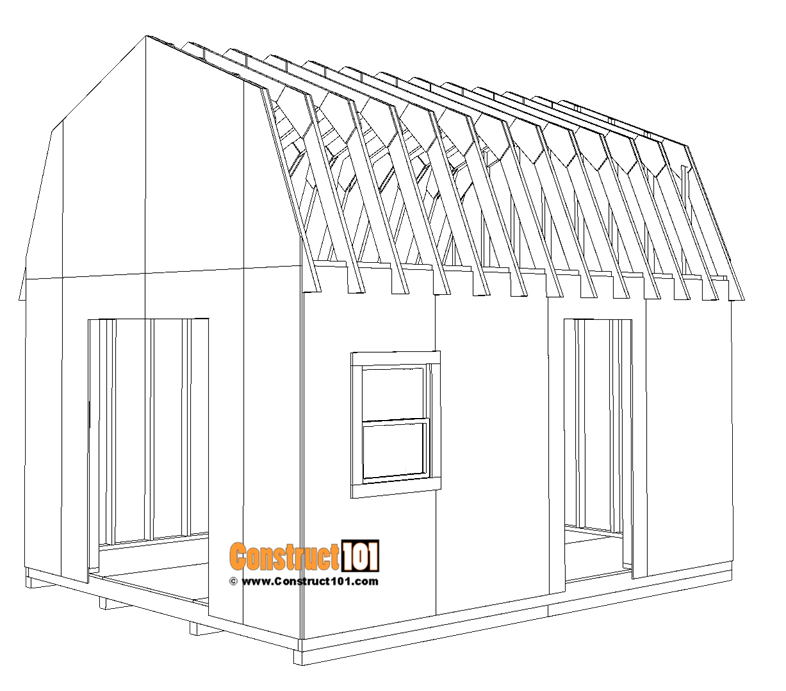
Install top siding using 2 in. finishing nails.
Use Z-flashing between the top and bottom siding.
Cut siding along rafters.
ROOF
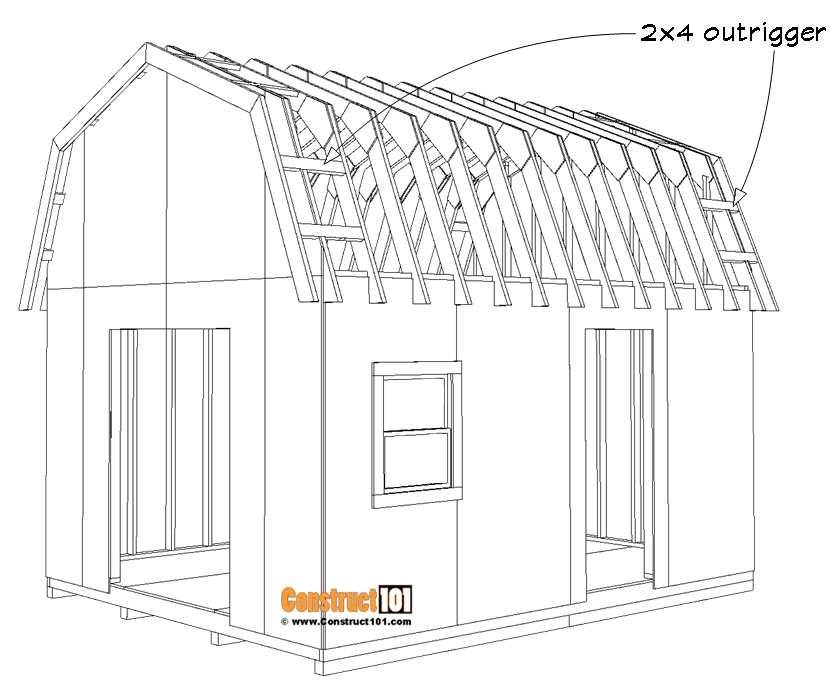
- 16 – 2×4 – 21 3/4 in.
The front and back of the shed will have about an 8 in. roof overhang.
To make the overhang bigger or smaller adjust the length of the outriggers.
Notch the front and back rafters and siding to fit around outriggers.
Install using 3 1/2 in. nails.
Use the remaining rafters for the front and back roof trim.
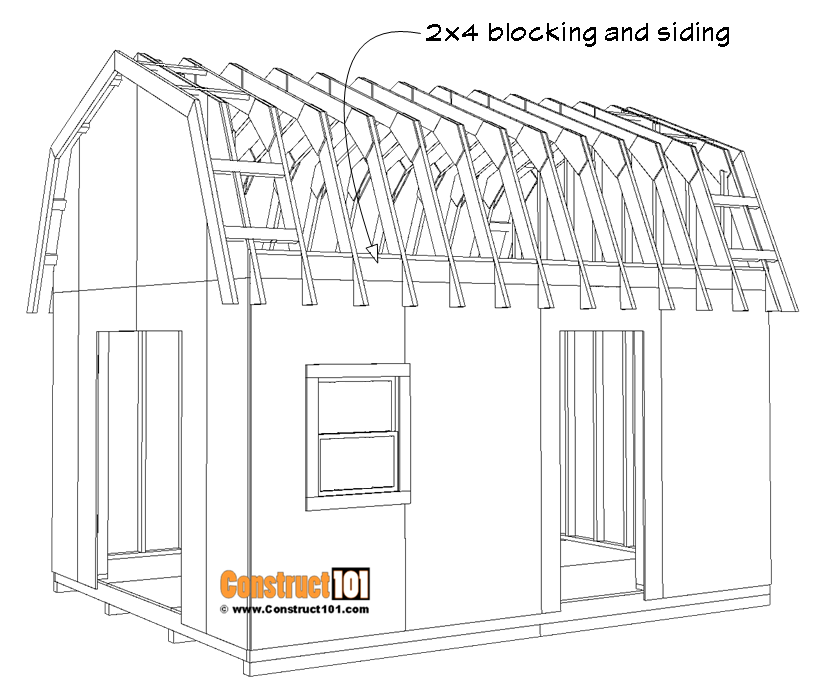
- 4 – 2×4 – 8 ft.
Measure and cut 2×4’s and siding to size to fill in the gaps between the walls and roof as shown on drawing.

- 11 – plywood – 1/2 in. x 4 ft. 8 ft.
Measure and cut 1/2 in. plywood to size for the roof deck.
Install the roof deck using 2 in. nails.
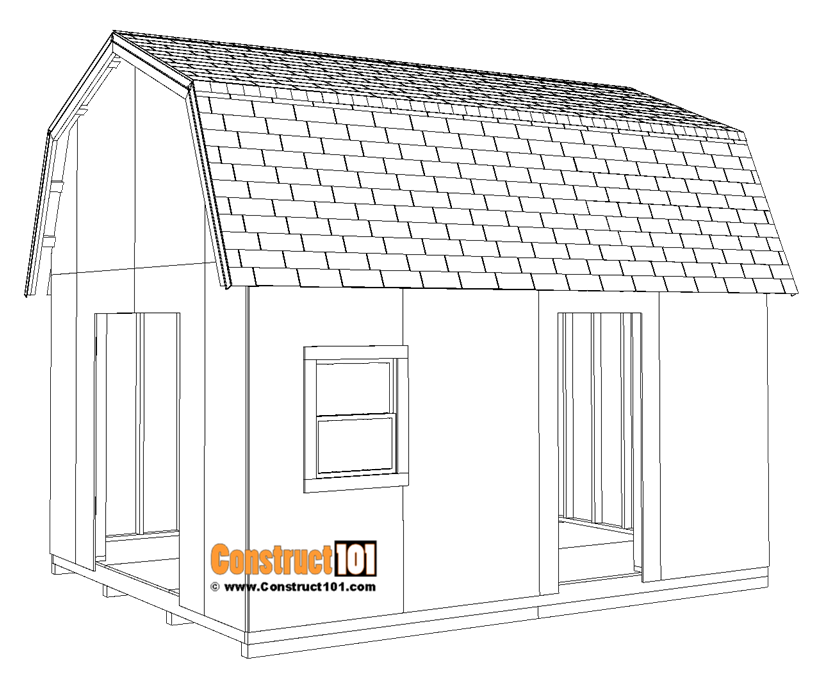
Install roofing felt, drip edge, and shingles.
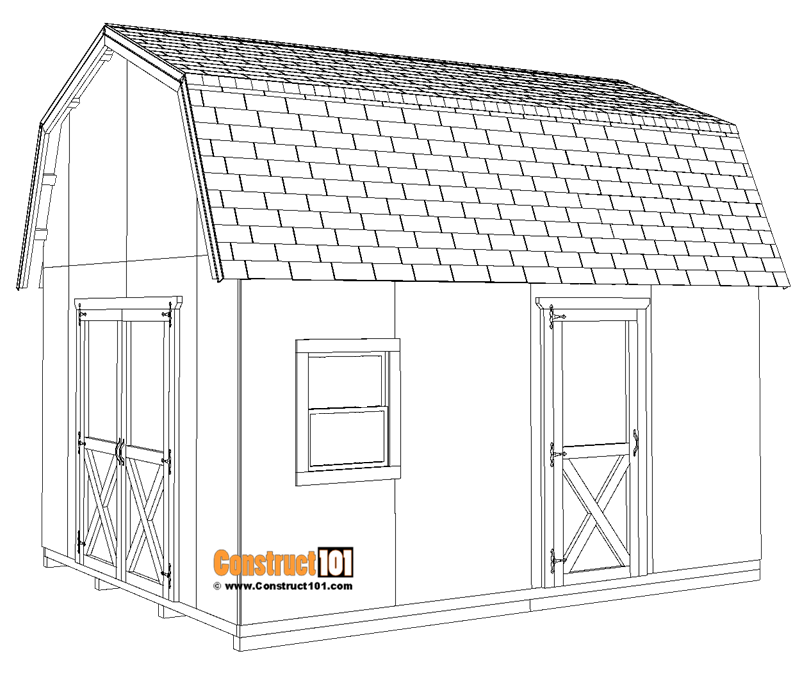
TRIM
- 6 – 1×4 – 8 ft.
- 4 – 1×4 – 10 ft.
Measure and cut 1×4 lumber to size for the window and corner trim.
Use 2 in. finishing nails to install 1×4 trim.
PDF DOWNLOAD – 12×16 Barn Shed Plans
-
12×16 Barn Shed Plans | PDF Download
-

Large 10×12 Lean To Shed Plans | PDF Download
-

12×16 Shed Plans – Gable Design – PDF Download
If you like these DIY projects let me know in the comments below, thanks for your support!


Love your plans, built a picnic table and it turned out perfect, families favorite table outside. On the barn shed, how about a 10×16 design! some of us are limited to sq ft on external buildings and love a barn design to hang bikes and not break heads
My wife and I built a shed similar to this shed in 1988 and it has some wear and tear on it. We were looking to to build a new one or just add on to one of our existing buildings.
I’m starting a project in which these plans will be SUPER handy and I really appreciate them being here. I originally considered purchasing a shed kit, but I needed something more sturdy. Do you have an idea of what the roof load limit is? My design includes metal panel roofing and solar panels. I’m trying to decide if I’ll need more reinforcement for the trusses.
Need a set of plans