
DIY 4×8 lean to shed, plans include a PDF download (link at bottom of blog post), material list, shopping list, cutting list, measurements, and drawings.
DIY 4×8 Lean To Shed | Overview


DIY 4×8 Lean To Shed | Shopping List
| Qty | Disc. | Size |
|---|---|---|
| Floor | ||
| 2 | 4×4 (pressure treated) | 8 ft. |
| 6 | 2×6 (pressure treated) | 8 ft. |
| 1 | 3/4 in. plywood | 4 ft. x 8 ft. |
| Wall Frame | ||
| 35 | 2×4 | 8 ft. |
| Rafter | ||
| 3 | 2×6 | 10 ft. |
| 1 | 2×6 | 8 ft. |
| Siding | ||
| 6 | t1-11 exterior siding | 4 ft. x 8 ft. |
| Roof | ||
| 2 | 1/2 in. plywood | 4 ft. x 8 ft. |
| Trim/Soffit | ||
| 3 | 1×6 | 10 ft. |
| 8 | 1×4 | 8 ft. |
| Door | ||
| 9 | 2×4 | 8 ft. |
| Hardware | ||
| Door Hinges | ||
| Shed Door Latch | ||
| Spring Loaded Latch Pin | ||
| Galvanized Nails | 3-1/2 in. | |
| Galvanized Nails | 2 in. | |
| Galvanized Finishing Nails | 1-1/4 in. | |
| Deck Screws | 2 in. | |
| Shingles | ||
| Roofing Felt | ||
| Drip Edge | ||
| Roof Tacks | ||
| Roof Staples |
DIY Lean To Shed | Cutting List
| Qty. | Disc. | Size |
|---|---|---|
| Floor | ||
| 2 | 4×4 (pressure treated) | 96 in. |
| 2 | 2×6 (pressure treated) | 96 in. |
| 7 | 2×6 (pressure treated) | 45 in. |
| 1 | 3/4 in. plywood | 4 ft. x 8 ft. |
| Front Wall Frame | ||
| 2 | 2×4 | 96 in. |
| 6 | 2×4 | 74 1/2 in. |
| 2 | 2×4 | 71 in. |
| 2 | 2×4 | 63 in. |
| 1 | 1/2 in. plywood | 3-1/2 in. x 63 in. |
| Back Wall Frame | ||
| 2 | 2×4 | 96 in. |
| 9 | 2×4 | 86-1/2 in. |
| Side Wall Frame | ||
| 4 | 2×4 | 41 in. |
| 8 | 2×4 | 74-1/2 in. |
| Rafters | ||
| 7 | 2×6 | 56 in. |
| Siding | ||
| 2 | t1-11 exterior siding | 48 in. x 79-1/4 in. |
| 4 | t1-11 exterior siding | 48 in. x 96 in. |
| Roof | ||
| 1 | 1/2 in. plywood | 48 in. x 54-5/8 in. |
| 1 | 1/2 in. plywood | 32-5/8 in. x 54-5/8 in. |
| 1 | 1/2 in. plywood | 16-5/8 in. x 54-5/8 in. |
| Trim/Soffit | ||
| 2 | 1×6 | 98-3/4 in. |
| 2 | 1×6 | 56-5/8 in. |
| 2 | 1×4 | 78-7/8 in. |
| 2 | 1×4 | 78-5/8 in. |
| 4 | 1×4 | 90-1/2 in. |
| Door | ||
| 2 | 2×4 | 74-1/4 in. |
| 4 | 2×4 | 67-1/4 in. |
| 4 | 2×4 | 30 in. |
| 2 | 2×4 | 23 in. |
| 1 | 2×4 | 68 in. |
Floor

- 2 – 2×6 (pressure treated) – 96 in.
- 7 – 2×6 (pressure treated) 45 in.
Cut the 2×6 floor joists and bands to size.
Assemble as shown on drawing.
Nail 3-1/2 in. nails through the bands and into the joist.

- 2 – 4×4 (pressure treated) – 96 in.
Cut the 4×4 skids to size.
Assemble as shown on drawing.
Toenail 3-1/2 in. nails through the floor frame and into the 4×4 skids.

- 1 – 3/4 plywood – 4 ft x 8 ft.
Install the 3/4 in. plywood floor deck as shown on drawing.
Screw 2 in. deck screws through the floor deck and into the floor frame.
Front Wall
- 2 – 2×4 – 96 in.
- 6 – 2×4 – 74-1/2 in.
- 2×4 – 71 in.
- 2 – 2×4 – 63 in.
- 1 – 1/2 in. plywood – 3-1/2 in. x 63 in.

Frame the front wall with door opening as shown on drawing.
Assemble using 3-1/2 in nails.
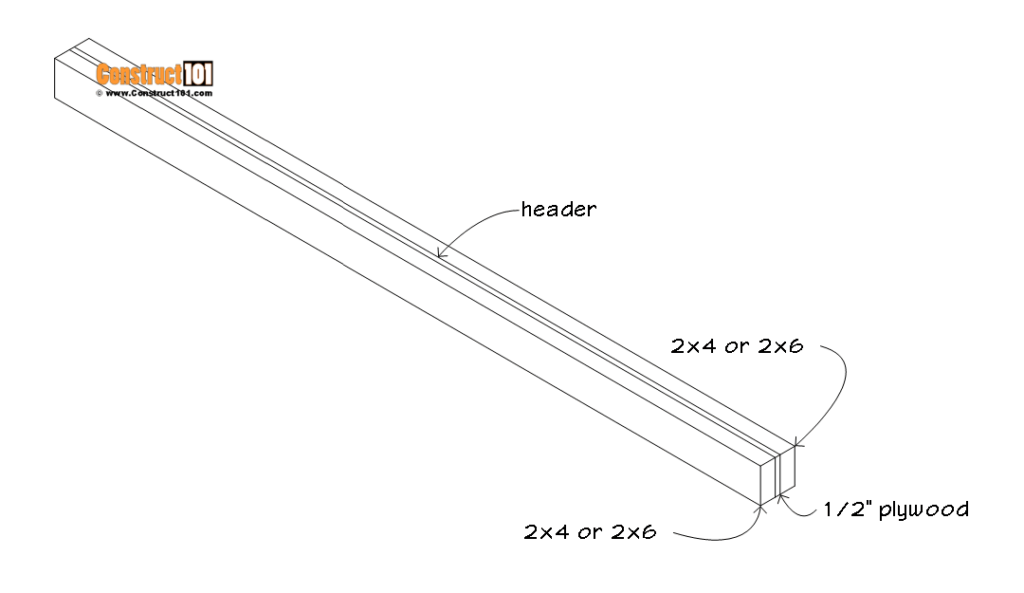
Header details, cut 2×4’s and 1/2 in. plywood to size, assemble as shown on drawing using 2 in. nails.
Back Wall
- 2 – 2×4 – 96 in.
- 9 – 2×4 – 86-1/2 in.

Frame the back wall as shown on drawing.
Assemble using 3-1/2 in. nails.
Side Walls
- 4 – 2×4 – 41 in.
- 8 – 2×4 – 74-1/2 in.

Assemble the side walls for the right and left side as shown on drawing.
Assemble using 3-1/2 in. nails.

Attach the walls to the floor.
Nail 3-1/2 in. nails through the wall bottom plate and into floor.
Nail 3-1/2 in. nails into corner wall frame.
Cut and remove bottom plate from door opening as shown on drawing.
Rafters
- 7 – 2×6 – 56 in.
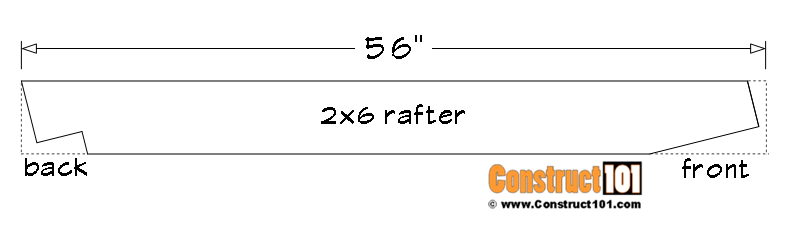
Cut seven 2×6’s to 56 in.
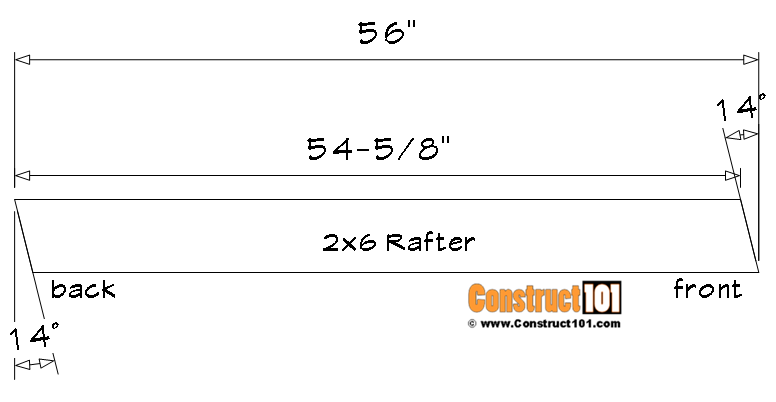
Cut 14-degree angle cuts on both ends in the same direction.
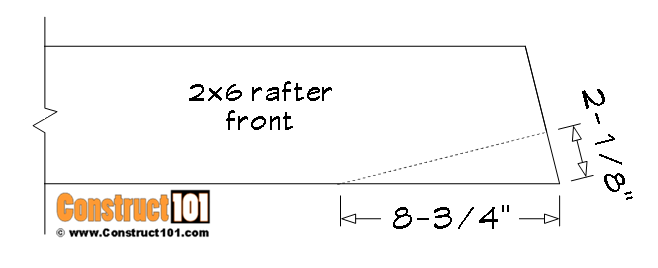
Cut the front end of the rafter as shown on drawing.
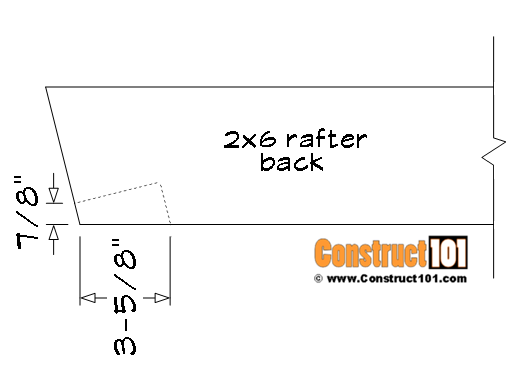
Measure back end of rafter end as shown on drawing.
Use a framing square and draw out the line as shown on drawing.
Cut out the back end of the rafter.

Install the rafters as shown on drawing.
Toenail 3-1/2 in. nails through the rafters and into the top plates.
Siding
- 2 – t1-11 exterior siding – 48 in. x 79-1/4 in.
- 4 – t1-11 exterior siding – 48 in. x 96 in.

Cut two t1-11 siding panels to size and install using 1-1/4 in. galvanized finishing nails.
Nail through the siding and into wall frame.

Cut the door opening.
The siding that has been cut out will be used to make the door.

Use two t1-11 siding panels for the back.
Nail 1-1/4 in. galvanized finishing nails through the siding and into the wall frame.

Use two t1-11 siding panels for the right and left side.
Nail 1-1/4 in. galvanized finishing nails through the siding and into the wall frame.
Roof
- 1 – 1/2 in. plywood – 32-5/8 in. x 54-5/8 in.
- 1 – 1/2 in. plywood – 48 in. x 54-5/8 in.
- 1 – 1/2 in. plywood – 16-5/8 in. x 54-5/8 in.

Cut the 1/2 in. plywood sheets to size and assemble as shown on drawing.
Nail 2 in. nails through roof deck and into rafters.
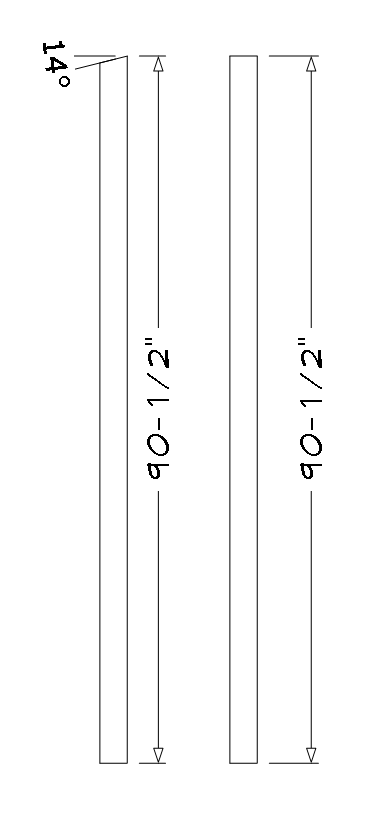
Trim/Soffit
- 2 – 1×6 – 98-3/4 in.
- 2 – 1×6 – 56-5/8 in.
- 2 – 1×4 – 78-7/8 in.
- 2 – 1×4 – 78-5/8 in.
- 4 – 1×4 – 90-1/2 in.

Measure and cut t1-11 scrap siding and install soffit as shown on drawing.
Nail 1-1/4 in. galvanized finishing nails through the soffit and into rafters.

Cut 1×6 roof trim as shown on drawing.
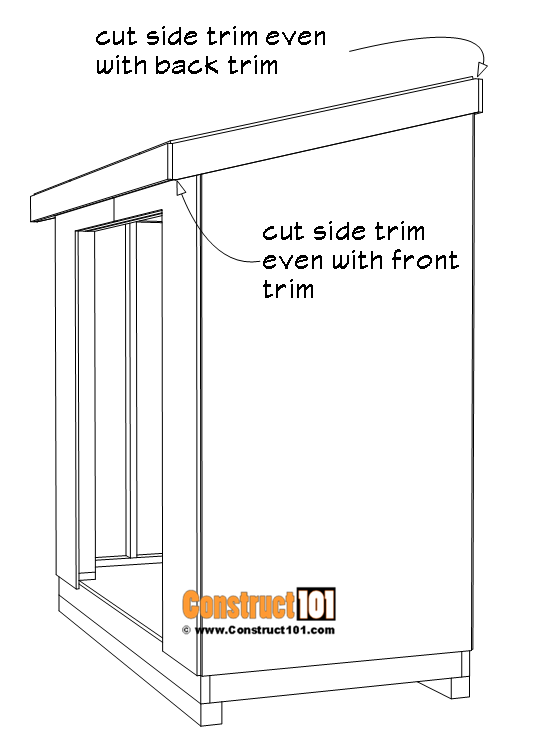
Install as shown on drawing using 1-1/4 in. galvanized finishing nails.

Cut 1×4 corner trim as shown on drawing.

Install using 1-1/4 in. galvanized finishing nails.
Door
- 2 – 2×4 – 74-1/4 in.
- 4 – 2×4 – 67-1/4 in.
- 4 – 2×4 – 30 in.
- 2 – 2×4 – 23 in.
- 1 – 2×4 – 68 in.

Build the shed door with the siding that was cut out of the door opening.
Lay the 2×4’s in a flat even surface.
Next lay the siding on top of the 2×4’s.
Nail 2 inch nails through the siding and into the 2×4’s.
The T1-11 siding will have a lip that overlaps with the opposite side, leave the siding lip exposed.
Install door hinges.

Install door to shed using 3-1/2 in. nails.
Install 2×4 lintel on top of door.
Shingles

Install roofing felt, drip edge, and shingles.
PDF DOWNLOAD


Like this DIY project? Leave a comment below!


Why do you slope the roof toward the door side instead of the back side?………
I would think this shed is designed to place next to a building, like the back of your house. You’d want the rain water running off the roof away from the house.