
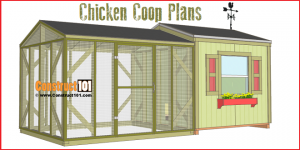
DIY chicken coop run plans. Chicken run measures 8′ wide, 4′ 3″ deep, and 5′ 7″ tall.
Chicken run plans include free PDF download (link at bottom of blog post), shopping list, cutting list, measurements, and illustrated instructions.
Chicken Coop Run Plans 4×8 – Overview


Chicken Coop Run Plans 4×8 – Material List
Shopping List
18 – 2×4 – 10′
2 1/2″ pocket screws
3 1/2 nails
wire mesh
staples
door hinges
door handle
Cutting List
4 – 2×4 – 8′
11 – 2×4 – 5′
18 – 2×4 – 2′
9 – 2×4 – 4′
2 – 2×4 – 4′ 5″
4 – 2×4 – 1′

Front Wall:
Cut two 2×4’s to 8′ long and four 2×4’s to 5′ long.
Assemble the front wall using 2 1/2″ pocket screws.

Front Wall:
Cut four 2×4’s to 2′ long, cut a 45 degree angle cut on both ends.
Assemble as shown on illustration above using 2 1/2″ pocket screws.

Back wall:
Cut two 2×4’s to 8′ long and three 2×4’s to 5′ long, assemble as shown on illustration above using 2 1/2″ pocket hole screws.
Cut four 2×4’s to 2′ long, cut 45 degree angle cuts on both ends. Assemble as shown on illustration above using 2 1/2″ pocket screws.

Side wall:
Cut four 2×4’s to 4′ long, and four 2×4’s to 5′ long. Assemble as shown on illustration above using 2 1/2″ pocket screws.
Cut eight 2×4’s to 2′ long, cut 45 degree angle cuts on both ends. Assemble as shown on illustration above using 2 1/2″ pocket screws.

Attach the wire mesh to the walls using staples, do not attach wire mesh to the door opening.
Attach the front wall, and back wall to the side walls using 3 1/2″ nails.

Cut five 2×4’s to 4′ long and install as shown on illustration above using 3 1/2″ nails.
Cut and install wire mesh to the top using staples.

Door:
Cut two 2×4’s to 4′ 5″ long and two 2×4’s to 2′ long.
Cut four 2×4’s to 1′ long, cut 45 degree angle cuts on both ends.
Assemble as shown on illustration above using 2 1/2″ pocket screws.
Cut and install the wire mesh to the door using staples.

Install door hinges and door handle to the door and install.


Thank you, these are great plans
DO NOT USE THESE PLANS.
Something is very wrong with this plan. You can’t drill through 4 inches with screws that are 2 1/2″ long if you lay the wood as the diagrams suggest, but if you turn the 2×4’s the way you would frame a wall all the measurements are off. Also you can never build a structure 5 feet 7 inches tall with the cuts that are suggested. This plan should be taken down or corrected. I just spent $350 on supplies, hopefully I can salvage a run by going freehand.
Plans are correct, use pocket screws to assemble the walls, easy build.
A 2×4 measures 1 1/2″ x 3 1/2″. The 5 foot wall stud plus 3 1/2″ plus 3 1/2″ wall plates will equals 5 feet 7 inches.
Use a Kreg Pocket Tool to install from the side angled up into the wood. Use a pocket tool to drill the holes. Plan is correct. See ink to the tool used.
https://www.amazon.com/Kreg-K4-Pocket-Hole-System/dp/B001DYFISG/ref=asc_df_B001DYFISG/?tag=hyprod-20&linkCode=df0&hvadid=309802506143&hvpos=1o3&hvnetw=g&hvrand=15747403151912537251&hvpone=&hvptwo=&hvqmt=&hvdev=c&hvdvcmdl=&hvlocint=&hvlocphy=9029576&hvtargid=pla-338189062226&psc=1
I spent $60 on this plan and it worked great for me and I have zero experience and basic tools.
Hi Luis..I am looking to build my coop and really like this one-how were you able to spend $60? Guessing you already had supplies??
You can also toe nail it
Excellent, thanks.
The cuts are messed up and the corners come together funky. The door
Are the plans free? Couldn’t a link for a free version, only one available for a donation?
Plans are free when you leave donation amount at zero.
I have never used pocket hole jig or screws before, not sure where to place them on the angled braces, could you please describe where to locate.
How can I get a hold of these prints? Is donation required?
leave a donation of $0 and once you checkout you can download for free.
Buy –> cut list slightly off — USE A LINEAR CUT CALCULATOR —
If you look solely at the lengths of pieces added up then the Purchase List is accurate… but either you WILL RUN OUT of boards (or you’ll need to cut each piece shorter — usually 1/8″). This is due to the “kerf” (the width of the cut made by a saw blade)… it’s small but adds up quickly when cutting several pieces from 1 board.
A linear cut calculator allows you to put in the thickness of your blade (usually 0.125″) and then calculate the most efficient cut pattern for each board, based upon the length/qty of each stock (8′,10′,12′,etc).
Just Google linear cut list calculator – enter your materials available (i.e., 96″, 120″, 144″, etc; I leave qty empty and it’ll adjust itself). Then put in the length and qty of each piece needed in the cut list. Then hit calculate, and it’ll return the Qty of each length of board and a visual cut diagram.
(FYI, there are sheet calculators for plywood too)
Including the kerf and the required cut lengths (exactly as stated), you will need 20 (using only 10’ers)… but the LEAST WASTE ($ and materials) pattern I could find was ~91% material used, consisting of (14) 2x4x10’s & (6) 2x4x8’s cut like this:
2x4x10’s:
> 5x — 60″/48″
> 4x — 48″/24″/24″/12″
> 4x — 60″/24″/24″
> 1x — 53″/53″
——————————-
2x4x8’s:
> 4x — 96″ (no cut)
> 2x — 60″/24″
I hope this helps for anyone just getting in to DIY/woodworking.
I LOVE this site – it’s practically my home page in my browser lately! Keep up the great work!
I am loving this plan so far. I don’t have a Kreg or other system for pocket screws, but I was able to use two sizes of bits to create the holes.
QUESTION about the door. The plan shows a 2-foot opening, and calls for a 2-foot door width. I think I’d want to cut the door slightly smaller to make sure it doesn’t stick, correct? Also, I am expecting I’ll want some kind of simple stop. Thoughts? Thanks
P.S. Although the $0 donation amount was suggested, I felt good about leaving a small monetary donation for this plan.