
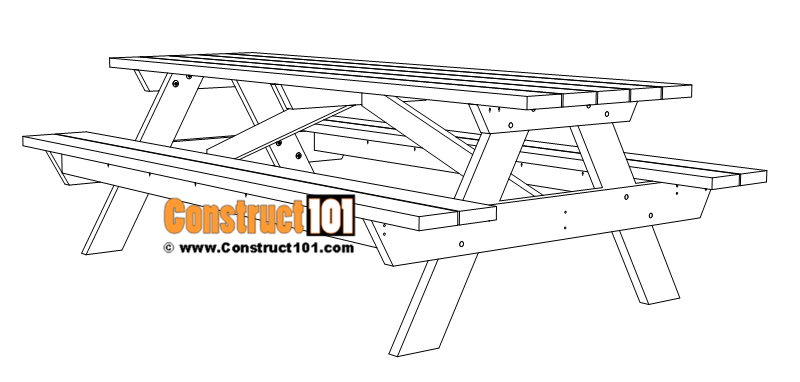
8 foot picnic table plans. Plans include a PDF download (link to PDF at bottom of post), shopping list, cutting list, drawings, and measurements.


Material List
Cutting List
- A (battens) -3 – 2×4 – 28 1/2″ (30-degree angle cut on both ends in opposite directions)
- B (table top boards) – 5 – 2×6 – 96″
- C (legs) – 4 – 2×6 – 36″ (30-degree angle cut on both ends in the same direction)
- D (seat supports) – 2 – 2×6 – 60″ (30-degree angle cut on both ends in the opposite directions)
- E (seat braces) – 4 – 2×4 – 77″
- F (table braces) – 2 – 2×4 – 41 7/16″ ( 20-degree angle cut on both ends in the same direction)
- G (seat boards) – 4 – 2×6 – 96″
Shopping List
- 6 – 2×4 – 8′
- 12 – 2×6 – 8′
- 2 1/2″ pocket hole screws
- 3″ deck screws
- 16 – 3 1/2″ carriage bolts, washers, nuts
- exterior wood glue
8 ft Picnic Table Plans – Overview


- A (battens) -3 – 2×4 – 28 1/2″ (30-degree angle cut on both ends in opposite directions)
Cut the battens (A) as shown on drawing above. Drill pocket holes to the brace (A) to screw into the table top boards (B).

- B (table top boards) – 5 – 2×6 – 96″
Cut the table top boards (B) to size. The table top boards are spaced out 1/4″, secure the battens (A) to the table top boards (B) using exterior wood glue and pocket hole screws.

- C (legs) – 4 – 2×6 – 36″ (30-degree angle cut on both ends in the same direction)
Cut the legs (C) as shown on drawing above.

Install the legs (C) as shown on drawing above. Use wood clamps to hold legs in place. Drill holes through the legs (C) and into the battens (A). Secure using exterior wood glue and carriage bolts, washers, and nuts.

- D (seat supports) – 2 – 2×6 – 60″ (30-degree angle cuts on both ends in the opposite directions)
Cut the seat supports (D) and assemble as shown on drawing above. Use wood clamps to hold seat supports (D) in place. Drill holes through the seat supports (D) and into the legs (C). Secure using exterior wood glue and carriage bolts, washers, and nuts.

- E (seat braces) – 4 – 2×4 – 77″
Cut the seat braces (E) and drill pocket holes as shown on drawing above.

Install the seat braces (E) as shown on drawing above.

Use 3″ deck screws and exterior wood glue to install the seat braces (E). Pre-drill holes and screw 3″ deck screws through the seat supports (D) and into the seat braces (E).

- F (table braces) – 2 – 2×4 – 41 7/16″ ( 20-degree angle cuts on both ends in the same direction)
Cut the table braces (F) as shown on drawing above.

Pre-drill holes, use exterior wood glue and 3″ deck screws to install the table braces (F) as shown on drawing above.

- G (seat boards) – 4 – 2×6 – 96″
Install the seat boards (G) as shown on drawing above. Use exterior wood glue and pocket hole screws, screw through the seat braces (E) and into the seat boards (G).


If you have any plans for small chicken coop to house 4 to 6 chickens please send.
Thank You.
Eric Butler
Thank you!!
These plans were very clear and easy to follow. The table turned out beautiful! The only thing we did differently was use some of the leftover deck screws to further secure the benches. Thank you for the plans!
Awesome! Good solid plans. Be sure to glue and screw.
Instead of using the 4-2×4’s for the seat bench braces, I was wondering what you thought of putting another set of legs and support on the middle batten. Do you think that would pose a problem for seatting? One other thing why not use 1-2x6x12 for the legs, you can get all four with no drop and you know what those drops are worth today! Building the table now,easy plans great table.Thank you!!
what diameter are the carriage bolts?
I would use 3/8″
Just finished building this! Thanks for the plans – it was pretty simple to do. Hope to enjoy this table for years to come!
Good plans!
I like your detail in your plans i’m building two tables to donate to my grand children’s christen summer camp thanks for the free plans, i’ will have the grand kids help to build these tables that way they have some skin in the project and can tell their friends they helped to build these tables
It is a good design but the angle on the legs is incorrect from everything else it sits up taller with the angle of the legs it gave us.
Fantastic set of plans! Pocket screws are a great way to avoid water getting trapped around fasteners. The cut list was perfect and had virtually no waste. Thank you for sharing!
I have built qty 4 of the 8′ picnic tables and qty 1 of the 6′ picnic tables. The plans are super helpful and super easy to follow. The final result has been amazing. I am building qty 3 of the 8′ and qty 1 of the 6′ for Christmas presents this year for my children and their spouses – they are as excited to get them as I have been to build them.
Thank you so much for these plans.
I am starting the children’s picnic table this week and will be doing the double chair with table and the round picnic table in the very near future.
Thank you – I never have been interested in woodworking until I cam across your website – please don’t stop providing the plans – you are inspiring a new generation of woodworkers
Table brace (F) is the wrong size. Luckily I measured before I cut. It should be a hair over 42 1/4 inches. Not 41 7/16ths. That’s assuming the battens (A) are 8″ OC from the edge (as is clearly pictured).
It also means seat braces (E) are 78 1/2″
I would like the PDF Download for the 8-foot picnic table. I am an ag teacher in Indiana, and I have been asked to have my class build 12-15 new picnic benches for our fairgrounds.