
DIY double chair Bench with table. Bench plans include a PDF download (link on bottom of post), cutting list, shopping list, measurements, drawings, and video assembly.
Pictures from these plans
 |  | | |
DIY Double Chair Bench With Table | Build Video
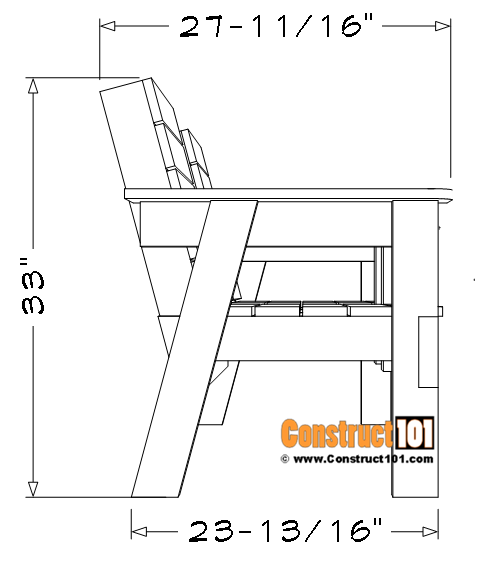
Overview

DIY Double Chair Bench With Table | Material List
Shopping List
| Qty. | Disc. | Size |
| 5 | 2×4 | 8 ft. |
| 1 | 2×6 | 8 ft. |
| 5 | 1×4 | 8 ft. |
| 2 | 1×6 | 8 ft. |
| deck screws | 2 in. | |
| deck screws | 2-1/2 in. | |
| exterior wood glue |
Cutting List

| Part# | Qty. | Disc. | Size |
| A | 2 | 2×4 | 23 in. |
| B | 1 | 2×6 | 61 in. |
| C | 2 | 2×4 | 23-1/4 in. |
| D | 2 | 2×4 | 24-3/4in. (15-degree angle cut on both end in same direction) |
| E | 1 | 2×4 | 58 in. |
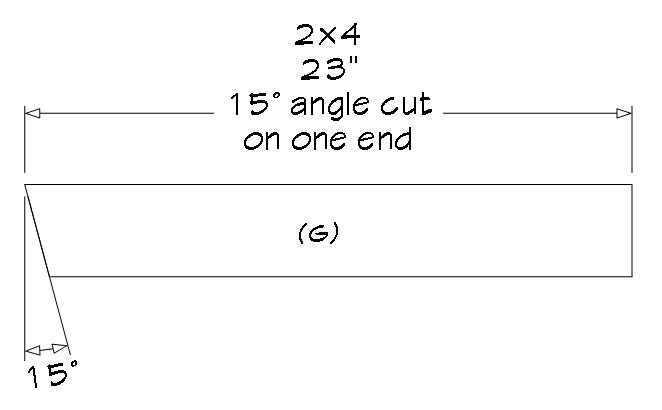
| F | 4 | 2×4 | 20-3/8 in. (15-degree angle cut on one end) |
| G | 4 | 2×4 | 23 in. (15-degree angle cut on one end) |
| H | 2 | 2×4 | 13-1/2 in. |
| I | 2 | 2×4 | 17 in. |
| J | 10 | 1×4 | 20-1/2 in. |
| K | 10 | 1×4 | 19 in. |
| L | 5 | 1×6 | 25 in. |
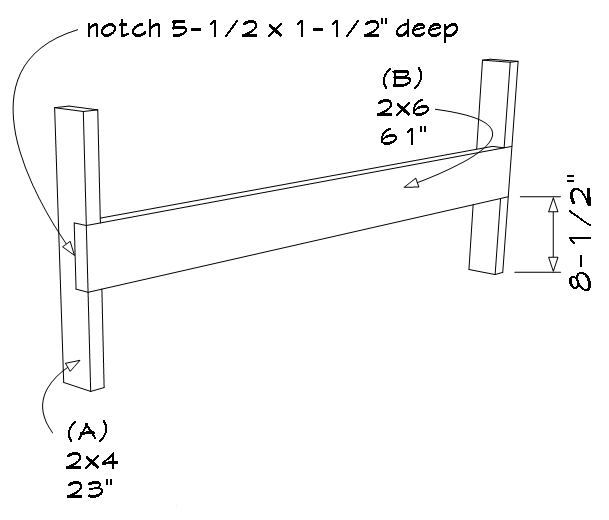
- (A) – 2 – 2×4 – 23in.
- (B) – 1 – 2×6 – 61in.
Cut two 2×4’s to 23 inches for the front legs (A). Notch the front legs 5-1/2inches by 1-1/2 inches deep as shown on drawing above.
Cut a 2×6 to 61 inches for the front rail (B).
Assemble as shown on drawing above. Use exterior wood glue, pre-drill holes, and screw 2-1/2 inch deck screws through the front rail (B) and into the front legs (A).
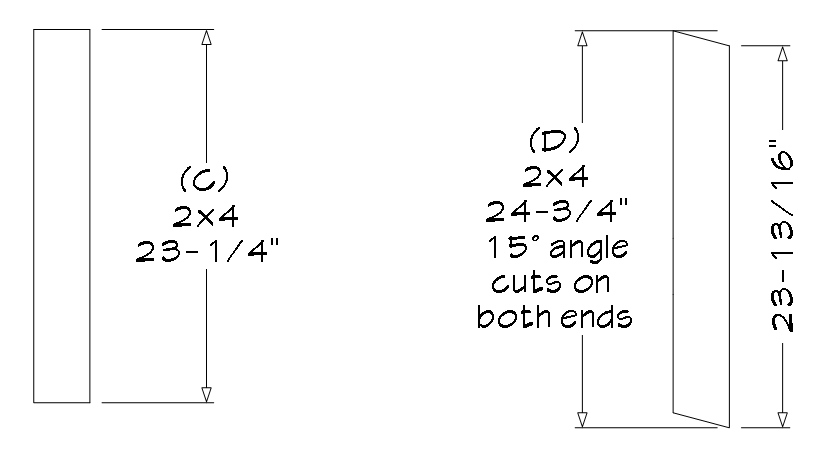
- (C) – 2 – 2×4 – 23-1/4in.
- (D) – 2 – 2×4 – 24-3/4in. (15-degree angle cut on both end in same direction)
Cut two 2×4’s to 23-1/4 inches for the arm supports (C).
Cut two 2×4’s to 24-3/4″, with 15-degree angle cuts on both end in the same direction, for the back legs (D).
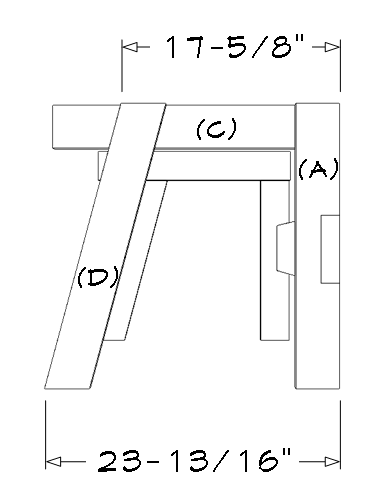
Assemble as shown on drawing above. Use exterior wood glue, pre-drill holes and screw 2-1/2 inch deck screws through the back leg (D) and into the arm supports (C).
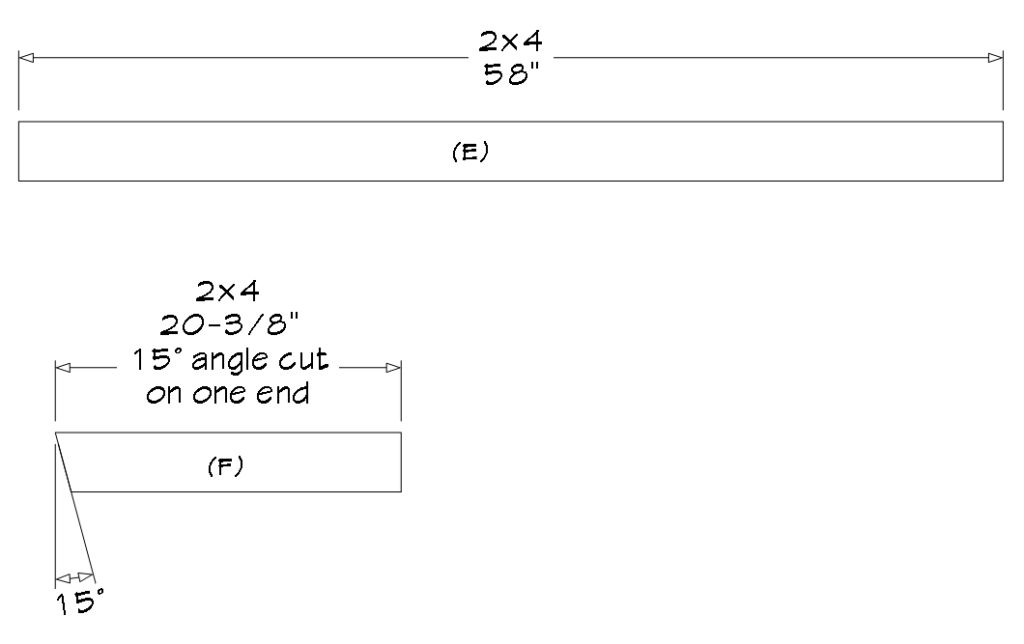
- (E) – 1 – 2×4 – 58in.
- (F) – 4 – 2×4 – 20-3/8in. (15-degree angle cut on one end)
Cut a 2×4 to 58 inches for the back rail (E).
Cut four 2×4’s to 20-3/8 inches, with a 15-degree angle cut on one end, for the seat supports (F).

Assemble as shown on drawing above. Use exterior wood glue, pre-drill holes, and assemble with 2-1/2 inch deck screws.
- (G) – 4 – 2×4 – 23in. (15-degree angle cut on one end)
Cut four 2×4’s to 23 inches with a 15-degree angle cut on one end for the back supports (G).
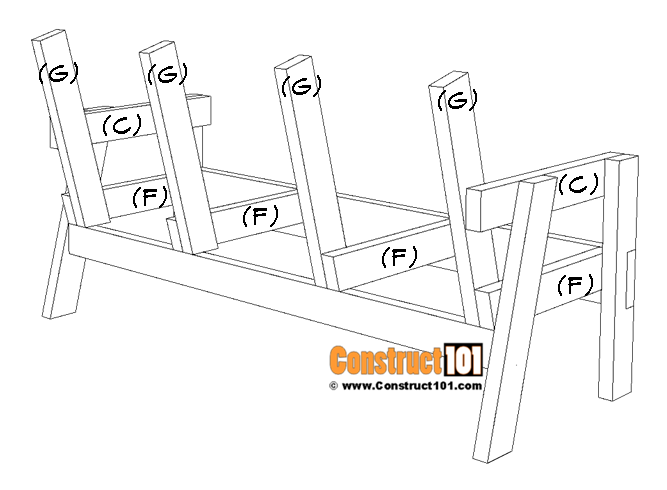
Assemble as shown on drawing above, use exterior wood glue, pre-drill holes and screw 2-1/2 inch deck screws through the back supports (G), into the seat supports (F) and arm supports (C).

- (H) – 2 – 2×4 – 13-1/2in.
- (I) – 2 – 2×4 – 17in.
Cut two 2×4’s to 13-1/2 inches for the table post (H).
Cut two 2×4’s to 17 inches for the table support (I).
Assemble as shown on drawing above. Use exterior wood glue, pre-drill holes, and 2-1/2 inch deck screws.
- (J) – 10 – 1×4 – 20-1/2in.
- (K) – 10 – 1×4 – 19in.
- (L) – 5 – 1×6 – 25in.
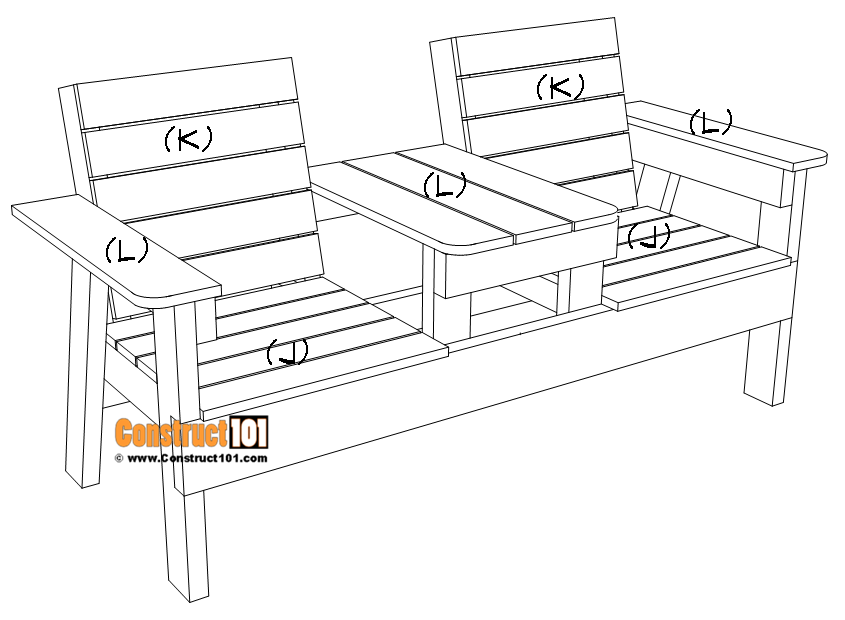
Cut ten 1×4’s to 20-1/2 inches for the seat slats (J).
Cut ten 1×4’s to 19 inches for the back slats (K).
Assemble as shown on drawing above.
Gap the seat slats (J) and back slats (K) 1/4 inch between slats. The front seat slat will have a 1/2 inch overhang in the front. Pre-drill holes and attach slats using 2 inch deck screws.
Cut five 1×6’s to 25 inches for the armrest and table slats (L). The armrest and table top will have a 1 inch overhang in front. Gap table top 1/4 inch between slats. Pre-drill holes and attach to bench frame using 2 inch deck screws.

Sand, stain, and seal to protect bench from the weather.


If you like these DIY projects, leave a comment below, share with your social media and friends, thanks.


Love the plans, but now downloading seems impossible! You used to be able to just click. For some reason the links send me back to the beginning of the plan.
There is no link at the bottom of the blog.
Gracias por el envío de este proyecto. Deseo realizar esta misma banca pero en versión única. Es decir que contenga un solo lugar para sentarse y no dos como este proyecto. Existe ese modelo? Gracias.
I cannot figure out how to print the plans! The directions say that there will be a link at the bottom of the page, but I cannot find the right one.
Where is the link to download and print the plans for the double bench ??? It is impossible to find.
Cant sign in to download plans
Please advise
Thank you love the plans
Caint find the plans
I have the plans. There were all right there on the website. I made this double bench. Mine doesn’t look anything like the pictures! The seat slats do not line up perfectly with the back slats. There’s no way that’s it’s even possible considering the 2×4 supports don’t line up. The measurements for the seat supports don’t make sense because the middle table doesn’t fit. I had to modify the dimensions of the table top make it fit.
It’s a nice bench but these plans are less than desirable.
How didn’t yours line up? I’ve cut and stripped all the wood almost before I stain then seal it. Ive went over the instructions and I dont see the flaws. Will be bummed though since I’m a begginer and this is my first project lol.
I have the downloaded plans and I look at them many times before I make my first cut. There are many dimensions missing from the plans. This makes it challenging for a beginner but not impossible for a seasoned wood builder. I will build it to the specs given and will make corrections if needed and take notes. Remember measure twice, cut once.
How much are you selling yallls for?