
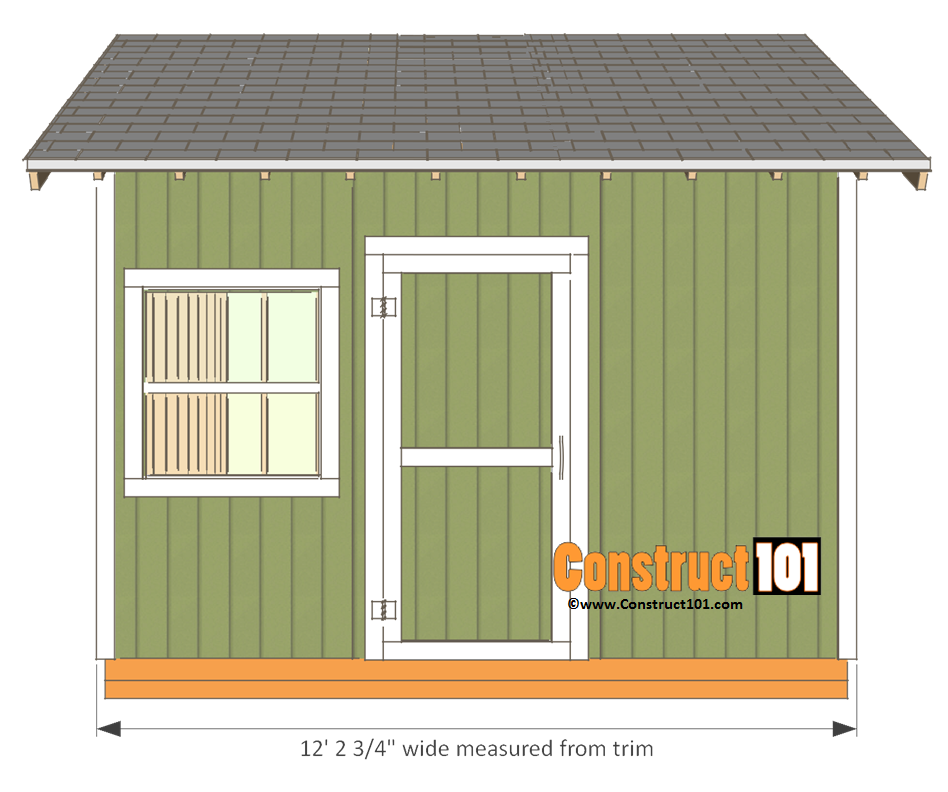
12×12 shed plans, with gable roof. Plans include free PDF download (link at bottom of blog post), drawings, measurements, shopping list, and cutting list.


12×12 Shed Plans – Gable Shed – Material List
Shopping List
2 – pressure treated 2×6 – 12′
10 – pressure treated 2×6 – 12′
4 – pressure treated 4×4 – 12′
81 – 2×4 – 8′
22 – 2×4 – 12′
4 – 2×6 – 8′
10 – 1×4 – 8′
5 – 3/4″ tongue and groove plywood – 4’x8′ sheets
15 – t1-11 exterior siding plywood – 4’x8′ sheets
8 – 1/2″ plywood – 4’x8′ sheets
shingles
roof tacks
roofing felt
staples
drip edge
3 1/2″ galvanized nails
1 1/4″ galvanized finishing nails
2″ galvanized nails
2″ deck screws
6 – door hinges
2 – door handles
Cutting List
2 – pressure treated 2×6 – 12′
10 – pressure treated 2×6 – 11′ 9″
4 – pressure treated 4×4 – 12′
16 – 2×4 – 12′
6 – 2×4 – 11′ 5″
48 – 2×4 – 7′ 6″
20 – 2×4 – 7′ 8 11/16″
10 – 2×4 – 2′ 8 3/8″
16 – 2×4 – 2′ 1 3/4″
4 – 2×6 – 7′ 8 11/16″
10 – 1×4 – 8′ ( cut to size )
5 – 3/4″ tongue and groove plywood – 4’x8′ sheets ( cut to size )
15 – t1-11 exterior siding plywood – 4’x8′ sheets ( cut to size )
8 – 1/2″ plywood – 4’x8′ sheets ( cut to size )

The shed floor is built with pressure treated 2×6’s and pressure treated 4×4’s.
Cut two 2×6’s to 12′ long for the band. Cut ten 2×6’s to 11′ 9″ long for the floor joist. Nail 3 1/2″ nails through the 2×6 band and into the floor joist. Floor joist 16″ O.C.
Attach the 12′ long 4×4 pressure treated skids to the bottom of the floor frame. Square out the floor frame by measuring diagonally until both sides measure the same. Secure the 4×4 skids by nailing 3 1/2″ nails through the floor frame and into the 4×4 skids.

Cut to size and install the 3/4″ tongue and groove plywood. Secure the floor plywood with 2″ deck screws.

The front and back wall frame is built using 2×4 lumber.
The wall studs are 16″ O.C.
Assemble the back wall frame as shown on illustration above ( see illustration below for close up view ).
The front wall frame will have a door and window, for instructions on framing the door and window see the pages below:
Assemble the front and back wall frame using 3 1/2″ nails.

Here is a close up look of the front and back wall frame ends.

Cut the 2×4’s as shown on illustration above for the side walls.
Wall studs are 16″ O.C.
If you will be adding a double door to the side wall of the shed see this page for details: Shed Door Plans
Assemble the side wall frame using 3 1/2″ nails.

See illustration above for truss details.

The truss is built using 2×4’s.
Cut the 2×4’s as shown on illustration above. The truss are assembled using 1/2″ plywood gussets. Nail 2″ nails through the gusset and into the truss.

Attach the truss to the shed 16″ O.C. Toenail 3 1/2″ nails through the truss and into the wall frame.
To build the 1′ overhand cut 2×4’s to 2′ 1 3/4″ long for the outriggers. Notch as shown on illustration above and install the outriggers using 3 1/2″ nails.
Once the outriggers have been installed cut to size the 2×6 roof trim as shown above and install with 3 1/2″ nails.
Install siding using 1 1/4″ finishing nails.
Install doors, and windows.

Cut 2×4’s to size and install between the rafters with 3 1/2″ nails.

Cut t1-11 siding to size and install between the rafters. Use 1 1/4″ finishing nails to install.

Measure, cut, and install the 1/2″ plywood for the roof deck.

Install roofing felt, drip edge, and shingles.
Install 1×4 trim.


Hi Just wondering what measurement the 12 x 12 is in Eg (feet , Meters …..)
Dude, 12×12 is 12ft by 12ft, standard measurement for sheds on the market. Not to mention the plans use an apostrophe (‘) for the dimensions of the building. ‘ represents feet, and ” represents inches.
If you need measurements in meters, go to google and type ‘ feet to meters ‘ and it brings up a converter in google’s search engine.
12ft = about 3.6576 meters, so 3.6576 x 3.6576 meter buidling
i see, thank you very much for explaining. It can be quite confusing to see when it means inch and when foot when you dont know the apostrof rule.
FYI just purchase a standard tape measure ( any where in the USA )
I love your Gable shed but I was wondering if it can easily be built to be to higher then 11 ft. I have to pull a permit for it and it is required a shed to be not taller then 11 ft
This shed isn’t taller than 11ft, it’s about 10ft 5in. I’m currently building it in my yard, working on the roof now.
Very good detail, enjoy just reading them, can wait to be able to start, all projects excellent.
I’m a bit confused after looking over the material list. The number of 2x4x8 listed is (88) which must be an error unless I’m missing something. Could you explain?
Thank you,
Mike
You need 50 for the walls, 22 for the roof rafters, 5 to be cut up for the king posts, and the remainder for door and window framing.
I didn’t see the parts list
these are good simple prints! all I would add is z flashing for the window top trim, bitchathane and flashing for the roof, and possible a vapor barrier for the grade.
hello,
Thanks for the free 12 x 12 shed plans, it is 12 ft tall which is perfect for me since my town regs for a shed is 144sqft 12ft tall.
I would like to leave the king post out so I can use the rafters for storage.
do you think that would be ok?
How much did it run you for the shed and the cost for labor?
On the 12×12 gable shed what are the dimensions for installing the out riggers? I know what the length of the out riggers are, just need to know how far apart to place them, thank you for your help.
Is it a standard 12″ overhang? I want to add vented soffit to keep insects, particularly bees out.
This shed is not that well sealed. You will have many critter friends no matter what you do.
Before I sided my shed, I cut the ends of the Lower Cords 26.5 degrees (opposite angle to the peak) so that a flat side was parallel to the studs (perpendicular to the ground) — the “Fascia”. I cut 2×4’s to run flush from the lower corner of the Fascia to the corresponding wall stud — the “Soffit”. Then I sided the shed. I cut siding pieces to size and attached them to the under side of the Soffit boards after cutting in soffit vents. Then I attached a 12’+ 1×6 to the Fascia ends so that it hung down over the soffit board about an inch. Fill in the ends with spare trim.
Remember, if you want air circulation to work, you need to install mushroom vents or a ridge vent in the roof.
Great comment!
Well and clearly stated.
Thank you.
Do you know the approximately cost of materials for this 12 x 12 shed?
I did a 10X10 shed and materials cost about $1,500. I had the roof trusses made by a truss company; the 10X10 required 6 trusses (put them on 2′ centers) and they cost about $150. I supplied the truss maker the truss drawing from the plans and the pre made trusses worked great; saved a lot of time. Invest in a nail gun and a small compressor if you do not have one; makes the job much easier.
The good ole days.
2023 would like a word…
2023 would like a word…
I love your plans! I am wondering about using rafters instead of trusses. I would like to have a loft for storage at each end. I’m thinking the trusses would prohibit access to the lofts. Is it necessary to use the trusses? and not rafters? Your thoughts and opinions would be appreciated.
I built a 12′ x 16′ shed. I left the King Post out of all the trusses. On the middle five trusses I left out the Lower Cord. On those five I used Hurricane Ties and extra blocking for stability. On the front and back trusses I doubled up the Lower Cord to strengthen the frame for the loft floor. I also doubled the Lower Cord on the two trusses closest to the center opening. For added lighting, I installed two pairs of 12″ x 12″ plastic fixed skylights side by side in the two center roof bays about 12″ down from on each side of the peak. It has been almost 10 years now and everything is still tight and firm.
I just priced everything besides roofing materials cement blocks, nails and changed the 1x4x8 trim to azek (pvc composite) from my local home depot I’m in Connecticut. Total just under 1,800$
I just built one lime this. Cost of materials is around $ 2200. From home depot.
your plans are very well detailed and are very much appreciated , thanks a lot
Perfect!! I am adding a skylight box to it with the top and bottom removable to be able to access my well housing, dual pressure tanks sit beside that. Then to fit yard tools tractor and ATV in there. Have to make room for the wifes car in garage,
1st: Is there any disadvantage to making the wall height 6′-6″ as opposed to 7′-6″?
2nd: Is there any reason (other than code) why I can’t use 24″ O.C. spacing for wall studs and roof rafters?
I have existing Gambrel roof shed with no king stud and snow load is no problem with that one.
3rd: Sounds lazy, but is there a material list that eliminates the side door and window stock?
Shorter wall height is fine. You just end up with less headroom.
I used 24″ on center for both the walls and roof (made roof trusses from 2×6’s) and everything has be fine.
simple, straight forward plans, and that’s a compliment not a put down in in manner. built my grandchild a tree house from these plans. thanks a lot
Is it possisble to change tje roof from 6:12 pitch to a 4:12 pitch and if so how can i figure my angle cuts for that roof instead
i would like rafter plans for 14×24 shed with salt box roof if possible angle cuts and length of front and back rafters
Google makes a simple, easy to learn CAD software called “Google Make” (it used to be called “Sketchup”). There is a free version and one you pay for. The free version is plenty good. I have been using it for 7+ years. It only takes a couple of hours to do the tutorial and you can start designing in 3-D. You can draw a board and use the Protractor key to rotate a line on the end to get your angle.
Another quick way would be to get a large piece of paper (perhaps a piece of poster board from the Dollar Store. Draw a rectangle that is 12″ wide by 24″ long. On one of the 24″ legs, measure in 4″ from the corner. For Kalief: Draw a line from this point down to the opposite corner. This angle is a 4″ (“Rise”) by 12″ (“Run”) pitch. Use this as a template or use a protractor to calculate the angle.
on the 9th picture you indicate the following: Cut 2×4’s to size and install between the rafters with 3 1/2″ nails.
Do you toenail the nails into the rafters or are the 2×4’s placed short side up?
Stand the boars up on the 1-1/2″ side.
Toenailing is fine. However, I would put every other board in place and nail each through the rafters into the ends of the the boards. Then I would toenail the others in between. Just me!
I couldn’t find anything that tells me how many shingles I need for this project.
Did I miss something?
Hey Barbara,
I did not see quantity of shingles for this or the 12×16 shed. With that a bundle of singles covers 33.3 sq ft, I’d round down to 32 sq ft per bundle. The roof looks to have about 224 total sq ft so I’d get 8 bundles. Your going to need extra for the starter row, ridge and waste…
Need engineered drawings to submit to Brevard county in Fla. for a 12 x 12 shed w/ high walls, possibly storage over 6’6″ inside height
If they need to be stamped by an architect or engineer, that is going to cost you some money. If all you need are dimensional drawings and you are computer savvy, download the free version of “Google Make” CAD software and run the tutorials. Using the drawings on this site and a little estimating (for door & window detail), you should be able to make line drawings of each wall and of the roof structure.
I am disappointed in the lack of detail. The door construction has no measurements. There is no explanation concerning the installation of the siding. There are no vents for air circulation
If you need someone to hold your hand you’re better off buying a shed kit.
someone needs to hold your hand to teach you how to make instructions.
I didnt have door measurements either and I just built them . First shed ever . It shows you how to frame it , use your imagination.
Very well explained plans. Bless you, my friend for sharing so much information for free!
Looking. For a 10×12 shed plan withGable roof at fight angle to each other
New user/reader here and no craftsman but have added on/doubled size of our house. Like someone else, just like reviewing plans. Like the barn look on the 8×8 Gambrel and similar to one I would like to erect close to the house for a generator. In Florida, would like to erect a hip roof version if anyone has something like that to share. Read RickP note, for air circulation, have always used a ridge vent. Is a mushroom better? never used one
Any reason why I couldn’t use 2×10’s to get increased loft space for storage?
Great plans.
Thank you for your effort to help others.
It wouldn’t surprise me at all if you were a Texan.
Hello. I downloaded shed plans with intent to donate if they were what I needed. They are close enough, so I’d like to throw you something, but cannot as I already downloaded them…. What other plans have you made on here I can use to donate? Or do you have a Patreon/similar?
Notching out the 2*4s….how are you all doing it?
Thanks so much for making these plans available! One of my classes just finished a shed from the plans. I wish I could attach a pic.
you guys really gotta download this app i found called PROJECT HELPER…DOES THIS IN SECONDS
Hi, if I have a cement slab, I am assuming I can leave out the floor portion of this plan. My city requires a cement slab with rat wall, which is existing from my previous shed.
What is a “rat wall”?
I think this great
I built this shed using these plans over the past week. It was as easy as I could have hoped. I shipped these drawings to my building inspector for my plans, I sent away the shopping list to my lumber supplier to package up and deliver the materials, and then started construction when everything was in order. I put the shed on a network of deck blocks to make the inspection process easier. I built the shed as it is laid out in the plans above, except for two minor changes. First, it had to be under 140 ft2 for permit reasons, so I made it 12×11.5ft. Secondly, due to some of the comments, I decided to try and make the loft area under the roof more accessible for secondary storage. The truss design featuring the kingpost essentially took away all of the overhead storage. However, the shed is huge – don’t discount the fact that this shed’s main space is nearly 8′ tall NOT including the loft. Nonetheless, it seemed like wasted storage space overhead. I kept the first truss over the door into the shed intact. The next three trusses I removed the lower chord and the kingpost. The fifth truss in, I beefed up. I tripled the lower chord, and made a small 4×4 header that spanned from the first truss to the fifth truss, and then used the remaining trusses as laid out in the plans. I put the scrap plywood on the “floor” of the loft in the back part of the shed, and it gave me some overhead storage. Overall, these plans were fantastic.
Great plans! Just completed construction and we passed our village inspection – even got compliments on our work from the inspector. Couple of comments:
1. The plan does not include sufficient plywood for the gussets – might want to add an extra sheet or two.
2. Gussets – I doubled up on all of them (except for the end rafters) for extra stability – inspector noticed and commented that it was a great add. Also used steel mending plates instead of plywood gussets to attach the king post to the lower chord.
3. Overhead storage – I built according to plan and made overhead storage using the extra (cheap) OSB sheets that my flooring OSB was sandwiched between on the pallet. Cut the sheets in 1/2 across the 4′ side, giving me 4 4’x4′ sheets for the loft flooring. Installed on either side of the king posts, up against the lower gussets prior to installing the siding (so you can slide them in from the open ends) – was then able to safely walk around up there to notch the end rafters/siding for the outriggers and for sheathing installation and now have extra storage. They were installed against the front and back ends, leaving a good open 4′ gap in the center of the shed for easy access.
4. Bracing in between rafters – cut 2″x4″ to length for each span and alternate left/right spacing so that they can be end-nailed on both ends.
5. Venting – using a jigsaw, added openings for two 4″x12″ vents on both the front and back – about 12″ down from the peak of the siding and on either side of the king post.
6. Notching the rafters for the outriggers – use a circular saw! Set the depth to 1.5″ to match the thickness of a 2″x4″ and mark the width (3.5″) – then make alot of closely spaced cuts until you can break the thin pieces loose. Clean up the bottom of the notch with a jigsaw, or just make your cuts so close together that you remove all the material with the circular saw.
7. Fascia – I cut the ends of the rafters so that the fascia runs parallel to the walls. Plan calls for 1″x4″ for the fascia, but go with 1″x6″ instead – corners will look nicer.
8. Door – we decided on a 5″ opening with a double door.. Constructed using T1-11, interior framing w/ 2″x4″‘s and exterior framing w/ 1″x4″‘s, exterior surface mounted hinges 3/side – very solid.
9. Workbench & shelving – had enough leftover 2″x4″/scraps and T1-11 to add a 12″x2″ workbench and two 9″ wide shelves above it, on either side of the 3″x3″ window we added. Installed the T1-11 smooth side up for a nice smooth surface.
Overall, great plan – easy to follow and great results!
Looking at your software to build a shed.
Can I edit items on your program?
Will your program allow me to build a custom shed?
I’m looking to build a shed 12’ x 12’ x 9’ walls on a existing concrete floor with 2 x 6” x 9’ walls, and a 8/12 roof pitch with gable ends. Will have a 7’ garage door on side and a 36” walk-in door on one gable end and a window on the other end gable side. Also will be installing vinyl siding, soffit and facia board.
Thanks
Hello. Nice plans. It looks pretty straight forward.
1) Can you please tell me what is the purpose of the 2x4s between the rafters? I see on houses how this area is usually open so the attic vents.
2) Also where the roof comes down past the wall, there is usually a flat soffits built with vented siding underneath. Would this be hard to do? What would I need to do differently to accomplish a flat underneath so it’s more like a house.
3) Why are the rafters spaced 16″ on center as opposed to 24″ on center like a house?
I would like to have a high ceiling without the rafters, is that possible? Also would like to have the sidewalls 8ft.
not 7 1/2 is that ok
Excelente y fácil manera de guiar para fabricar el cobertizo.
First, let me say thanks for putting all these plans together. I am in the process of building this 12×12 now with a few customizations. I do have a question regarding wall height as it relates to the siding. With a 7’6” high stud, the wall height is 7’10.5”. The siding comes in 8 foot sheets so only covers 1.5” of the rim joist. I plan to reduce overall wall height to 7’5.75” so that the siding ends flush with the bottom of the rim joist. Is there any reason why this might be a bad idea? I could see an issue if the floor was direct on grade but with the 4×4 runners the shed is up 3.5” off the ground. I’m setting it on a patio so won’t have grass growing against the shed which could contact the siding.
Where I live, the code has been changed allowing a structure up to 300sq ft with no utilities to be built without pulling a permit. I am allowed to pour concrete and fasten the structure to it also without permit. I wish this to be a garage and would like to build it 12’w x 25′ or 24′ L and 12′ H at the door. I am planning on a roll up door in the front and a man door on the side. Can you send me a detailed plan for that structure including fastening to the concrete slab.
Do the plans indicate a Snow Load Rating? It’s required to get a Building Permit where I live.
I love your plans! Being that will have to build this shed alone with no help, I am wondering about using rafters instead of trusses. I’m thinking the rafters will be easier to handle. Is it necessary to use the trusses? and not rafters? Your thoughts and opinions would be appreciated. Any cautions?
It would be helpful if you gave us an estimate of the quantities of fasteners, such as the nails, required for this project.
You might include some words about splicing some of these long boards that cost top dollar if they’re available at all.
Current prices from my local home depot, $2200 not including taxes and/or the base whether is block or concrete pad. The siding panels alone are $600+. I guess it doesn’t have to be done in one shot, but there is no way I can justify to my wife spending over $2200 to build a shed. I guess I’ll have to keep shifting around stuff in the garage.
Buy a $300 one from Amazon
FYI just purchase a standard tape measure ( any where in the USA )
Tanks for you help for plans
Thank you for the plans, it’s working out well, just one question. Can the roof truss’ be installed either way seeing it’s 12 x 12, in other words can they rest on either the “front wall frame” or the “side wall frame” ?
Love the Plans – thank you! One question, what are the 10 – 1″ x 4″ x 8′ (cut to size) for? I have been unable to locate where those are used.
Very last line. Install 1×4 Trim. (around the window etc)
These planslook very complete.
Do you have plans for a 14×14 shed build?
Great 👍
Do you have plans for 12 ‘ x 12’ with a 3’ knee wall with a gable roof?