

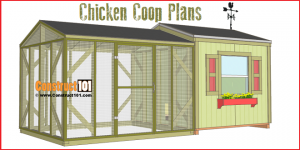
4×8 chicken coop plans – plans include a free PDF download (link at bottom of blog post), shopping list, cutting list, and step-by-step drawings.
4×8 Chicken Coop Plans – Overview


4×8 Chicken Coop Plans – Material List
Shopping List
Floor
10 – 2×6 – 8′
1 – 2×4 – 8′
Wall Frame
15 – 2×4 – 8′
Rafters
10 – 2×4 – 8′
Siding & Nest Box
(Nest box material is not included here, see nest box plans for details.)
6 – T1-11 exterior siding – 4×8 sheets
Roof Deck
2 – 2×4 – 12′
4 – 1/2″ Plywood – 4×8 sheet
Doors
7 – 2×4 – 8′
Hardware
3″ deck screws
3 1/2″ galvanized nails
2″ deck screws
2 1/2″ galvanized finishing nails
2″ galvanized nails
4 – door hinge
2 – door handle
2 – door latch
wire mesh
staples
roofing paper
shingles
roofing staples
roofing tacks
cutting List
Floor
4 – 2×6 – 2′ 5 1/2″
4 – 2×6 – 3′ 9″
4 – 2×6 – 8′
9 – 2×6 – 4′
1 – 2×4 – 4′
Wall Frame
6 – 2×4 – 4′
12 – 2×4 – 3′ 7 1/2″
2 – 2×4 – 1′ 1 1/2″
1 – 2×4 – 2′ 4 1/2″
3 – 2×4 – 6′ 7 1/2″
1 – 2×4 – 1′ 9 3/4″
4 – 2×4 – 3′ 6 1/2″
Rafters
10 – 2×4 – 6′ 6″ (40-degree angle cuts on both ends in the same direction)
Siding & Nest Box
(Nest box material is not included here, see nest box plans for details.)
6 – T1-11 exterior siding – 4×8 sheets (cut to size)
Roof Deck
4 – 2×4 – 5′ 9″
4 – 1/2″ Plywood – 4×8 sheet (cut to size)
Doors
7 – 2×4 – 8′ (cut to size)
Step 1 – Floor – 4×8 Chicken Coop Plans

Cut four 2×6’s to 2′ 5 1/2″ long and four 2×6’s to 3′ 9″ long. Assemble as shown on illustration above using 3″ deck screws.

Cut four 2×6’s to 8′ long. Assemble as shown on illustration above using 3″ deck screws.

Cut nine 2×6’s to 4′ long and one 2×4 to 4′ long. Assemble as shown on illustration above using 3″ deck screws.
Step 2 – Wall Frame – 4×8 Chicken Coop Plans

Left Wall Frame:
Cut two 2×4’s to 4′ long. Cut two 2×4’s to 3′ 7 1/2″ long. Cut two 2×4’s to 1′ 1 1/2″ long. Cut one 2×4 to 3′ 9″ long. Cut one 2×4 to 2′ 4 1/2″ long. Frame the left wall as shown on illustration above using 3 1/2″ nails.

Inside Wall Frame:
Cut two 2×4’s to 4′ long. Cut three 2×4’s to 6′ 7 1/2″ long. Cut one 2×4 to 1′ 9 3/4″ long. Frame the inside wall as shown on illustration above using 3 1/2″ nails.

Right Wall Frame:
Cut two 2×4’s to 4′ long. Cut three 2×4’s to 3′ 7 1/2″ long. Frame the right wall as shown on illustration above using 3 1/2″ nails.

Back Wall Frame:
Cut two 2×4’s to 3′ 6 1/2″ long. Cut three 2×4’s to 3′ 7 1/2″ long. Frame the back wall as shown on illustration above using 3 1/2″ nails.

Front Wall Frame:
Cut two 2×4’s to 3′ 6 1/2″ long. Cut four 2×4’s to 3′ 7 1/2″ long. Frame the front wall as shown on illustration above using 3 1/2″ nails.

Install wall frames as shown on illustration above using 3 1/2″ nails.
Step 3 – Roof Rafters – 4×8 Chicken Coop Plans

Cut ten 2×4’s to 6′ 6″ long. Make 40-degree angle cuts on both ends in the same direction.


On six of the rafters cut the bird’s mouth as shown on illustration above.

Cut three gussets from scrap plywood or from the roof deck plywood. Assemble the roof truss as shown on illustration above using 2″ deck screws.

Install the roof truss as shown on illustration above using 3 1/2″ nails.
Step 4 – Siding & Nest Box – 4×8 Chicken Coop Plans

Build and install the nest box, screw 3″ deck screws through the nest box and into the wall frame.

Measure, cut, and install the siding to the left wall, inside wall, and right wall using 2 1/2″ finishing nails. Cut the door opening for the inside wall.

Measure, cut, and install the siding to the front and back wall with 2 1/2″ finishing nails. Cut out the door on the siding, the piece that is cut out will be used to make the door.
Cut the siding for the wire mesh door, cut along the inside wall and along the floor frame, see illustration above.
Step 5 – Roof Deck – 4×8 Chicken Coop Plans

Cut four 2×4’s to 5′ 9″ long. Install as shown on illustration above using 3″ deck screws. Notch the rafters and siding 3 1/2″ wide and 1 1/2″ deep for the 2×4 rafter brace.

Install the four rafters that don’t have the bird’s mouth cut and install as shown on illustration above using 3 1/2″ nails.

Measure, cut, and install the roof deck using 2″ nails.
Step 7 – Doors – 4×8 Chicken Coop Plans

Measure and cut to size 2×4’s and install around the door opening as shown on illustration above. Nail 2 1/2 finishing nails through the 2×4 door trim and into the wall frame.

The door will be built with the siding that was cut out of the door opening. Measure and cut to size 2×4’s as shown on illustration above. Attach the 2×4’s to the siding with 2″ nails, nail through the siding and into the 2×4’s.

Install door hinges, handle, and door latch and install door to the chicken coop.

Cut two 2×4’s to 3′ 3 1/2″ long. Cut two 2×4’s to 3′ 9″ long. Notch the end as shown on illustration 3 1/2″ wide x 3/4″ deep. Assemble with 1 1/4″ deck screws. Cut the wire mesh to size and install to door using staples.

Install hinges and install door.
Step 8 – Shingles – Wire Mesh – 4×8 Chicken Coop Plans

Install roofing paper and shingles. Cut to size wire mesh and install to the floor frame using staples. Add rooster roof mount.


How many chickens is the chicken coop for?
From the floor plan it looks like 10 – 16 depending on size of chicken.
What about ventilation?
I added ventilation in the eaves soffit. I put hardwire in the space between the roof and the top of the exterior wall on the end where the nesting box is attached. Has worked great for 2 seasons. I do put a heat lamp in the coop when the weather gets into the negative temps and there is plenty of space in the rafters to attach the fixture without risk of causing a fire.
Love these plans! I would like to add wheels and a handle bar for movement.
Super bien Me encantan estos planes! Me gustaría agregar ruedas y un manillar para el movimiento.
It is possible to add wheels and a handle to this design however the oop weighs in around 400 lbs . Its meant to stationary
Finished the base, now working on framing the walls. Why do the walls use nails as opposed to screws? The nails I’m using 3 1/2 are splitting the 2 x 4’s. Can screws be used for this?
I only use screws in my projects! Also if splintering does occur, try predrilling holes
This is first time ever seeing this theses are awesome. Thanks you guy’s and gal’s
Awesome thank you
Yes love this coop and design but I am going to double it with 2 in 1 for a larger coop and more windows and add a pen that entirely surrounds the pen top sides ect with a electric fence around it because some animals like to dig and can get under it and kill chickens .
First time constructing a chicken coop and the construct101.com plans are great! Easy to follow and made shopping for materials a breeze. I took the plans and modified the nesting box (made it 5-hole/doubledecker). The only snag we ran into was the roofing plans, pitching on the rafters had to be adjusted from what the plans call for,…and I’d suggest waiting to cut out “birds mouth” in the rafters until you put the rafters on to see how/where the notches need to be cut. The plans give dimensions for how far along the rafter to make the notch for birds mouth. These measurements wound up being “off”. Even just the slightest margin of error will show up big when it comes time to align the rafters. Overall, great chicken coop design. We are using the coop for around 18 chicken. We made the nesting box 2x the height of original box design, with two holes on top and three holes on bottom of nesting box.
First time constructing a chicken coop and the construct101.com plans are great! Thanks
This is very good of you to share these plans. Thye’re some of the better plans and easiest to follow plans out there. Thanks, Gord
All
great plan can’t wait to build it
having a problem getting plans for the nesting box?