
This DIY project is for a chicken coop nest box. The box has three nesting boxes, but you can easily make it smaller or bigger by studying the plans below and making the proper modifications. This box can be attached to an existing chicken coop or wood shed. It has four holes in the front so you can run some bolts, washers, and nuts and attach it were it need be.
Free PDF download (link at bottom of blog post).
If you like these plans drop me a comment below. If you see something off or have an idea to improve these plans let me know in the comments below. Please share these plans with your social media friends, thanks.
Chicken Coop Nest Box Plans Material List
Shopping List
3 – 2×4’s – 8′ long
1 – 5/8″ – 4×8 T1-11 exterior siding sheet
2- hinges
3 1/2″ exterior nails
1 1/2″ deck screws
4 – bolts, nut, washers (fit to size)
Cutting List
4 – 2×4’s – 4′
4 – 2×4’s – 1′ 3″
4 – 2×4’s – 9″
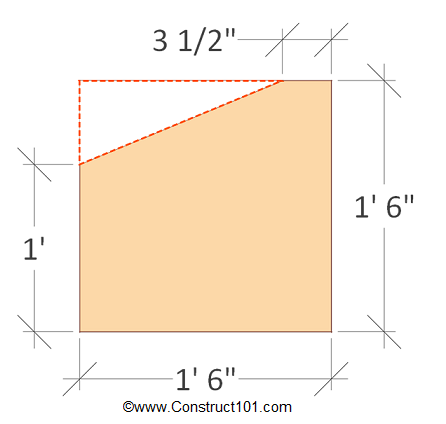
2 – siding – 1′ 6″ x 1′ 6″
1 – siding – 1′ 6″ x 4′
2 – siding – 9″ x 1′ 6″
1 – siding – 1′ x 4′
1 – siding – 1′ 6″ x 4′
1 – siding – 3 1/2″ x 4′
1 – siding – 1′ 3 11/16″ x 4′
Chicken Coop Nest Box View

Chicken coop nest box has three nesting boxes.

Front view of chicken coop nest box, measures 4′ wide.
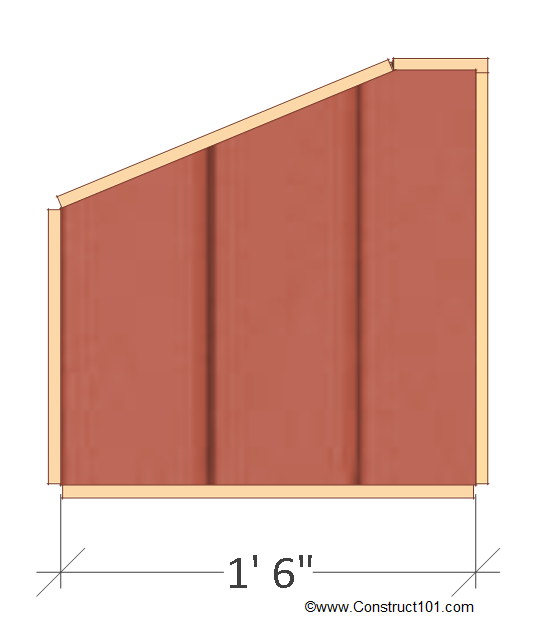
Side view of chicken coop nest box, measures 1′ 6″ deep.
Chicken Coop Nest Box Assembly
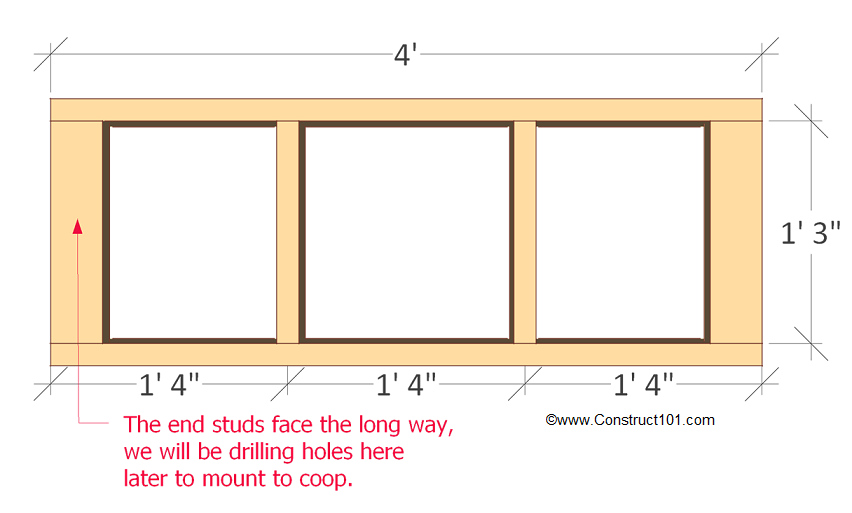
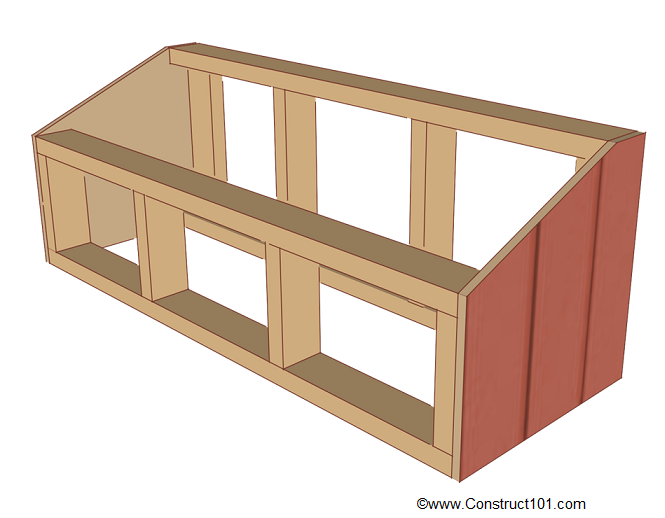


Start by building the front wall frame. Cut two 2×4’s to 4′ for the top and bottom plate and four 2×4’s to 1′ 3″ to use as wall studs. The end studs face the long way, see drawing above, we will be drilling holes here later to attach the nest box to the chicken coop. Assemble as shown, studs are spaced 1′ 4″ on center. Use 3 1/2″ nails to assemble, nail through the plate and into studs.
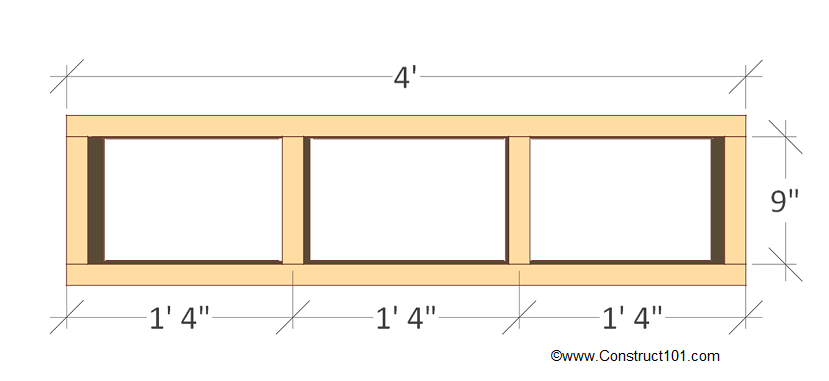
Next build the back wall frame. Cut two 2×4’s to 4′ for the top and bottom plate and four 2×4’s to 9″ for the wall studs. The studs are spaced 1′ 4″ on center, see drawing. Nail 3 1/2″ nails through the top, bottom plate and into the studs.
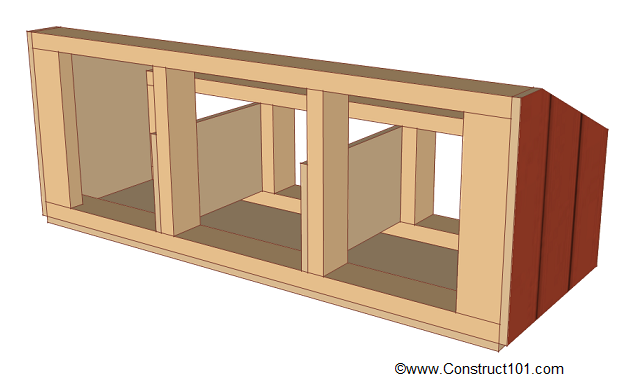
Cut two piece of siding as shown.
Attach the side siding to the front and back wall frame as shown in drawing above. Use 1 1/2″ deck screws to secure to frame.
Cut a piece of siding to 1′ 6″ x 4′ for the bottom. Secure into place with 1 1/2″ deck screws.
Cut two pieces of siding to 9″ x 1′ 6″ for the nest box dividing boards. Screw in with 1 1/2″ deck screws as shown above.
Cut the siding for the back wall to 1′ x 4′ and attach to frame using 1 1/2″ deck screws.
Cut a piece of siding to 1′ 6″ x 4′ for the front wall. Attach siding to frame with 1 1/2″ deck screws. Cut out doors to the nesting box, picture shown has 10″ holes for nest box entry. Drill holes through the siding and into the end studs. These holes will be used to run bolts, washers, and nuts to attach to chicken coop.
Cut a piece of siding to 3 1/2″ x 4′ for the top siding. Attach to frame as shown in drawing using 1 1/2″ deck screws.
Cut a piece of siding to 1′ 3 11/16″ x 4′ for the door. Install door using hinges as shown in drawing above.


What would be the best way to make this detachable? The coop we need to make is going to have to fit through our gate when we move so I need to be able to take the boxes off. I’d like to know the best and safest hardware to use so it’s sturdy.
i made 4. 2″x2″ French cleat cut blocks attached them to the corners of the nesting box with small strips on the sides to act as blockers to fill the gap and stop it from sling side to side. if you have other life stock or are concerned the coop may get knocked around you could add a locking mechanism or lock pad, to keep it attached but if you have a good cut the Wight alone should be enough.
Great design, simply and easy to construct.
I’m wondering if quick detach hardware similar to keymod designs would work instead of bolt/washer/nut assembly. Could be neater and less work to remove and clean out when needed.
Thank you
First, I love your design!
What type of wood is the red color wood used?
I have problems with the rafter for some reason can be touching the middle . Try different ways and always come short.
Thanks for the design plans. Just what I needed for my first birds.
Built one of your plans only change was from a gable roof to a slope roof everything else was your plans had very little waste material thanks for sharing your ideas
Great plans, thanks so much for posting!
Im wondering the best way to cut such good circles
you can use a router with a circle guide kit
Exactly wat I was looking for.. just da laying box & construction.. thank you
Ok so thank you THANK YOU for this simple plan it came out great and my two children were able to help. They are 7 and 10 yrs old and loved helping me. I used Smart side 4×8 sheet for exterior paneling but used 3/4 OSB for the two end pieces to be more structural sound since the end pieces basically hold it together. 3 stainless steel hinges for the top as well.
Doesn’t the hinged opening and flat top let rain/water in? An overhanging roof might help but then I assume you have to hold the lid open to get the eggs.
Thanks so much for these plans. My son and I are building a coop and we just modified this slightly to build our nesting boxes.
Made it so much easier!
What kind of material is recommended for the siding?
I would like a copy of these plans
Really like this nesting box, the only change I’d do is opening from the front instead of the top. Thanks so much for great plans.
Please send the link for the Chicken Coup Nest Box
I purchased the PDF’s for the 8X10 chicken coop and the Large chicken coop… and the plans do not match what you have on the website. There’s plans for a garden shed and adding windows… what gives?? I thought I would be nice and donate to get the PDF but I spent 10$ for nothing useful. Next time i’ll just copy and paste your website into a word document.
Never mind!
Sorry about that comment- it seems I was confused lol… I didn’t realize the shed plans were the actual chicken house. Thanks!
The nesting box is great. I have seven hens, and they use all three boxes to lay in.
My only suggestion is that the length of the box should be shortened by a couple of inches so the lid will fully cover the opening. My box sticks out past the eave of the roof and is exposed to rain when we have some.
I will be building another nesting box for a friend,and I will be cutting the 2 x 4s to 46 inches. I will cut the back, front and bottom to 47 1/4 ” wide to overlap the ends. This will give 3/8″ for the lid to overhang on each side.
Please send link to nesting box plans
LINK PLEAS