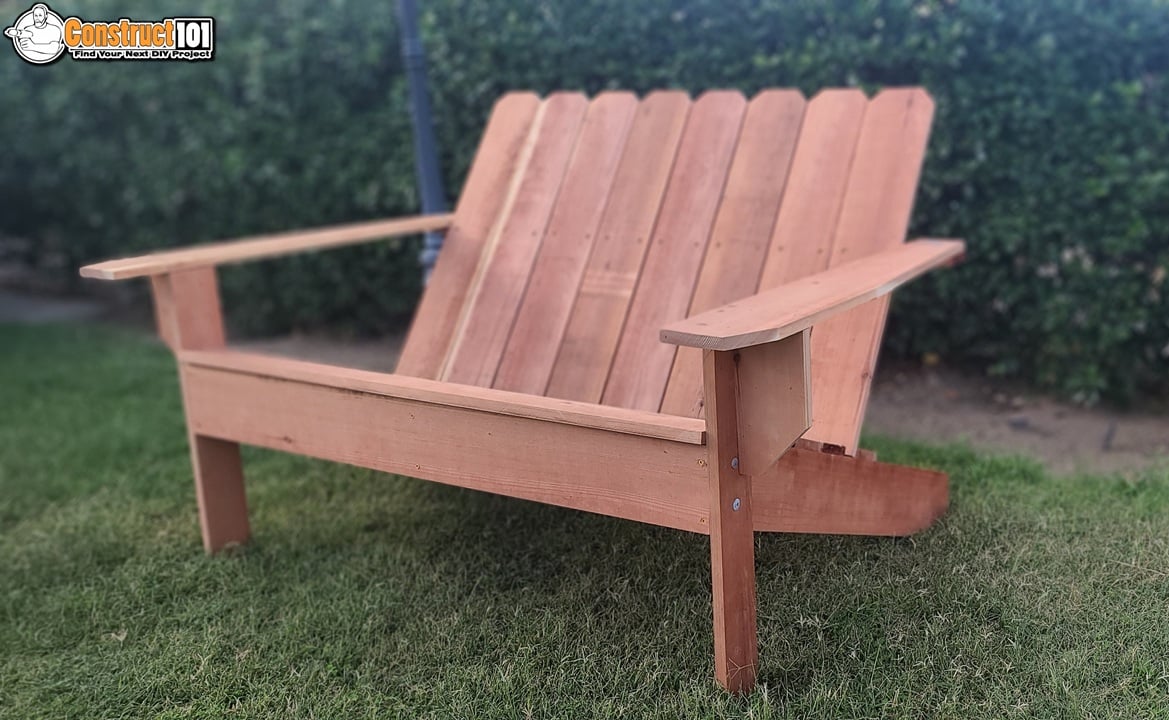
Adirondack bench plans. Plans include a free PDF download (link at bottom of blog post), shopping list, cutting list, drawings, and measurements.
Adirondack Bench Plans |Overview


Material List

Cutting List
| Part# | Qty. | Disc. | Size |
| A | 3 | 1×6 | 39 in. |
| B | 1 | 1×6 | 46 in. |
| C | 2 | 1×4 | 24 in. |
| D | 6 | 1×4 | 46 in. |
| E | 2 | 1×6 | 34 5/8 in. |
| F | 1 | 1×4 | 53 in. |
| G | 8 | 1×6 | 30 in. |
| H | 2 | 1×4 | 9 in. |
Shopping List
| Qty. | Disc. | Size |
| 6 | 1×6 | 8 ft. |
| 5 | 1×4 | 8 ft. |
| deck screws | 1 1/2 in. | |
| exterior wood glue | ||
| 8 | carriage bolts, nuts, washers | 2 in. |

- 3 – 1×6 – 39 in. (A)
Cut the seat brace (A) as shown on drawing above.

- 1 – 1×6 – 46 in. (B)
Cut the Front bench trim (B) to size.
Pre-drill holes and assemble using exterior wood glue and 1 1/2 in. deck screws.

- 2 – 1×4 – 24 in. (C)
Assemble as shown on drawing above.
Use clamps to hold parts together, drill holes for the carriage bolts, drill through the front legs (C) and into the seat brace (A).
Use exterior wood glue and install 2 in. carriage bolts through the holes, tighten with washer and nut.

- 6 – 1×4 – 46 in. (D)
Install the seat slats (D) as shown on drawing above.
The first seat slat will have a 1/2 in. overhang.
Gap seat slats 1/4 in.
The last seat slat will have a 12-degree bevel cut and a 2 in. gap.
Pre-drill holes and use 1 1/2 in. deck screws and exterior wood glue to assemble.

- 2 – 1×6 – 34 5/8 in. (E)
Cut as shown on drawing.

- 1 – 1×4 – 53 in. (F) (33-degree bevel cut)
Install the arm rest (E) and the back slat support (F) as shown on drawing above.
Pre-drill holes and use exterior wood glue and 1 1/2 in. deck screws to install the arm rest (E) to the front leg (C).
Drill holes into the arm rest (E) and into the back slat support (F). Use exterior wood glue and install 2 in. carriage bolts through the holes, tighten with washer and nut.
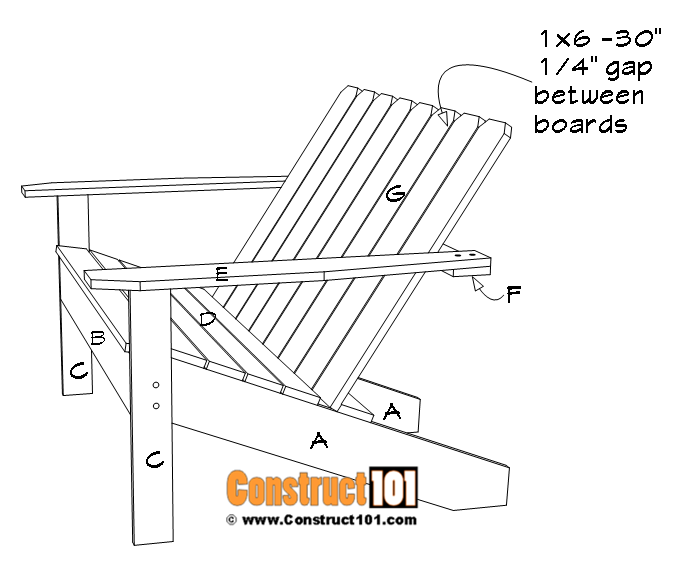
- 8 – 1×6 – 30 in. (G)
Pre-drill holes, install the back slats (G) using exterior wood glue and 1 1/2 in. deck screws.
Screw through the back slats (G) and into the last seat slat (D) (remove seat slats if necessary).
Screw through (G) and into back slat support (F)
Gap slats 1/4 in.

- 2 – 1×4 – 9 in. (H)
Cut as shown on drawing.
Install the arm rest brace (H) as shown on drawing above.
Pre-drill holes, use exterior wood glue and 1 1/2 in. deck screws to assemble.
Screw through (C) and (F) and into the arm rest brace (H).


Thanks 😊
Thanks 8
Thanks . You got some great stuff
Thanks for making it simple. Keep them coming
just retired and enjoy making these benches and chairs . wish you could show some plans for a glider bench. ty.