
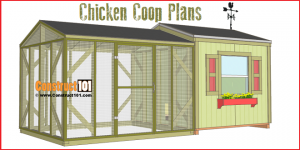
Pictures From These Plans
 | 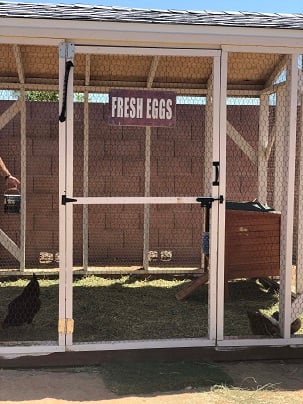 |  | |
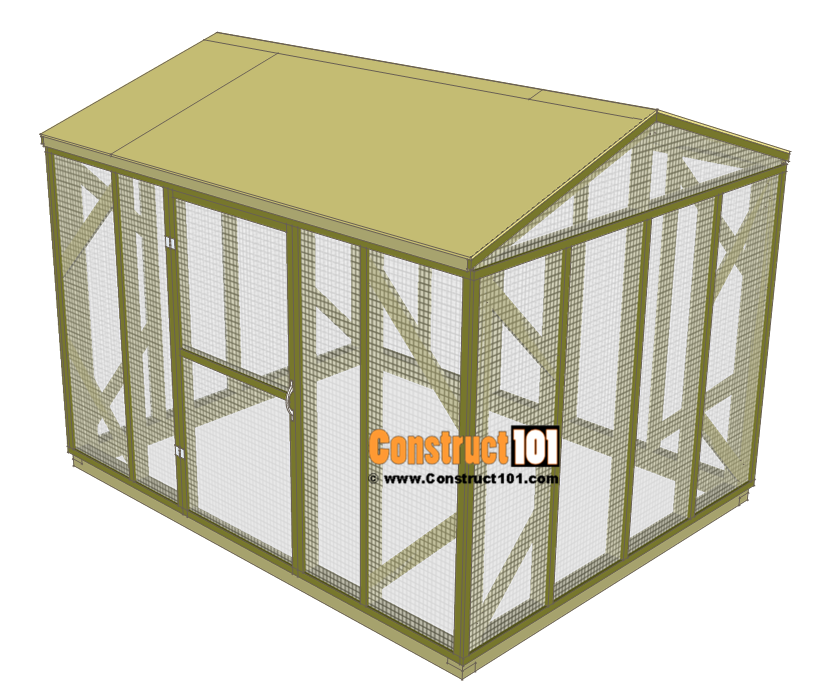
Chicken coop run plans – 10’x8′. Plans include a free PDF download (link at bottom of blog post), step-by-step instructions, material list with shopping and cutting list.
Chicken Coop Run Plans – 10×8 – Overview


Chicken Coop Run Plans – 10×8 – Material List
Shopping List
Floor
2 – pressure treated 4×4 – 8′
2 – pressure treated 4×4 – 10′
Front Wall
2 – 2×4 – 10′
3 – 2×4 – 12′
2 – 1×4 – 8′
Back Wall
2 – 2×4 – 10′
3 – 2×4 – 12′
2 – 1×4 – 8′
Right/Left Walls
4 – 2×4 – 8′
5 – 2×4 – 12′
4 – 1×4 – 8′
Roof
9 – 2×4 – 10′
Trim
38 – 1×2 – 8′
Door
4 – 2×2 – 8′
4 – 1×2 – 8′
Roof Deck
3 – 1/2″ plywood – 4’x6′ sheet
Hardware
3 1/2″ deck screws
3 1/2″ galvanized nails
2″ galvanized nails
1 1/2″ galvanized finishing nails
1 1/4″ deck screws
wire mesh
door hinges
door handle
roof felt
roof staples
shingles
roof tacks
Cutting List
Floor
2 – pressure treated 4×4 – 8′
2 – pressure treated 4×4 – 10′
Front Wall
2 – 2×4 – 10′
6 – 2×4 – 5′ 10″
4 – 1×4 – 3′ 2 11/16″ (45 degrees angle cuts on both ends in the same direction)
Back Wall
2 – 2×4 – 10′
6 – 2×4 – 5′ 10″
4 – 1×4 – 3′ 2 11/16″ (45 degrees angle cuts on both ends in the same direction)
Right/Left Wall
4 – 2×4 – 7′ 5″
10 – 2×4 – 5′ 10″
8 – 1×4 – 3′ 2 11/16″ (45 degrees angle cuts on both ends in the same direction)
Roof
2 – 2×4 – 1′ 2 3/8″
3 – 2×4 – 10′
12 – 2×4 – 4′ 2 7/16″
Trim
38 – 1×2 – 8′ (cut to size)
Door
2 – 2×2 – 5′ 11 1/2″
3 – 2×2 – 3′
4 – 1×2 – 8′ (cut to size)
Roof Deck
3 – 1/2″ plywood – 4’x8′ sheet (cut to size)
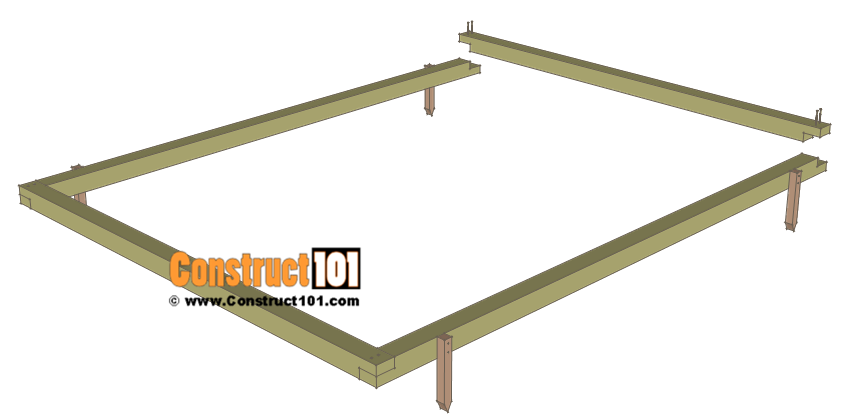
Floor
Use two pressure treated 4×4’s 8′ long and two 10′ long for the foundation. Notch the corners as shown on illustration above. Secure the corners using 3 1/2″ screws. To keep the foundation from shifting secure it down with wood spikes.
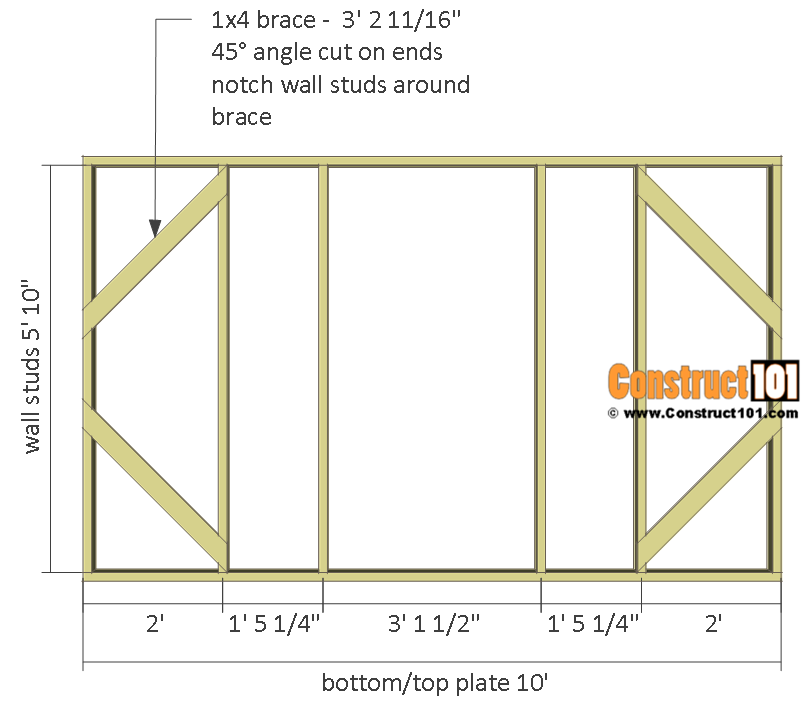
Front Wall
2×4 lumber will be used for the wall framing.
Cut two 2×4’s to 10′ long for the top and bottom plate. Cut six 2×4’s to 5′ 10″ long for the wall studs. Install as shown on illustration above using 3 1/2″ nails.
Cut four 1×4’s to 3′ 2 11/16″ long for the wall frame brace. The ends of the 1×4 boards will have 45-degree angle cuts in the same direction. Notch the wall studs around the brace as shown on illustration above. Nail 2″ nails through the 1×4 brace and into the wall stud.

Back Wall
Cut two 2×4’s to 10′ long for the top and bottom plate. Cut six 2×4’s to 5′ 10″ long for the wall studs. Install as shown on illustration above using 3 1/2″ nails.
Cut four 1×4’s to 3′ 2 11/16″ long for the wall frame brace. The ends of the 1×4 boards will have 45-degree angle cuts in the same direction. Notch the wall studs around the brace as shown on illustration above. Nail 2″ nails through the 1×4 brace and into the wall stud.
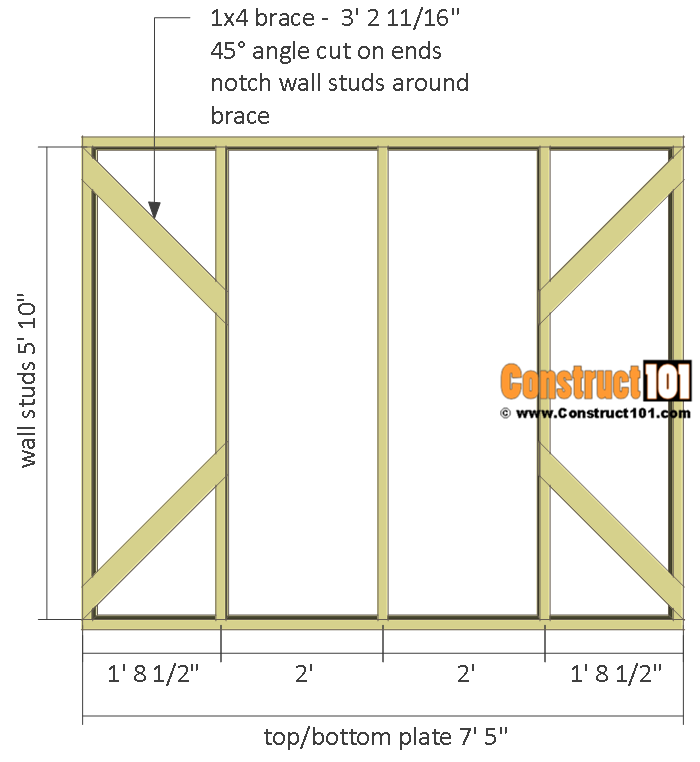
Right/Left Wall
Cut four 2×4’s to 7′ 5″ long for the top and bottom plate. Cut ten 2×4’s to 5′ 10″ long for the wall studs. Install as shown on illustration above using 3 1/2″ nails.
Cut eight 1×4’s to 3′ 2 11/16″ long for the wall frame brace. The ends of the 1×4 boards will have 45-degree angle cuts in the same direction. Notch the wall studs around the brace as shown on illustration above. Nail 2″ nails through the 1×4 brace and into the wall stud.
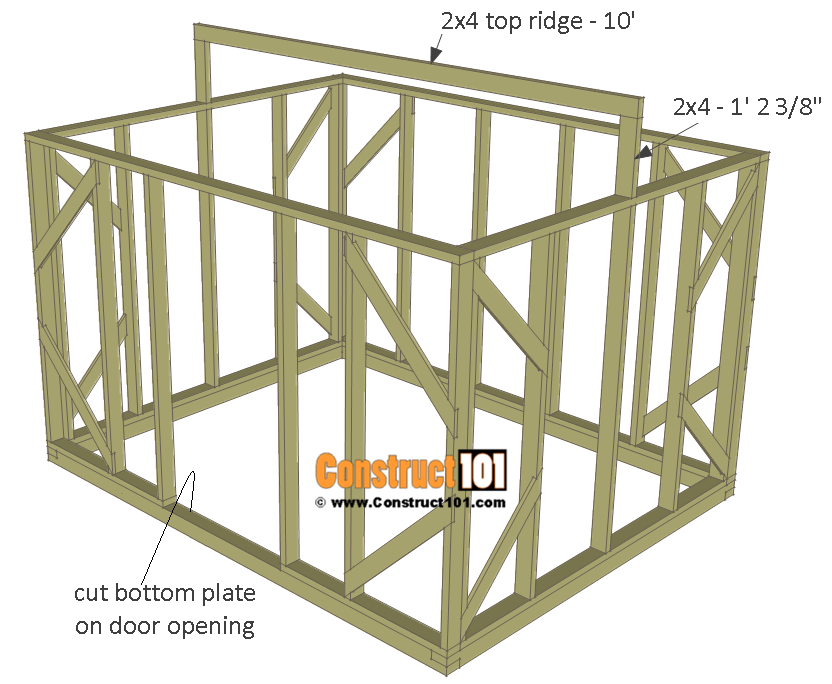
Roof
Build the top ridge using 2×4 lumber. Cut two 2×4’s to 1′ 2 3/8″ long and one 2×4 to 10′ long. Assemble as shown on illustration above using 3 1/2″ nails.
Remove the 2×4 plate on the door entrance as shown on illustration above.
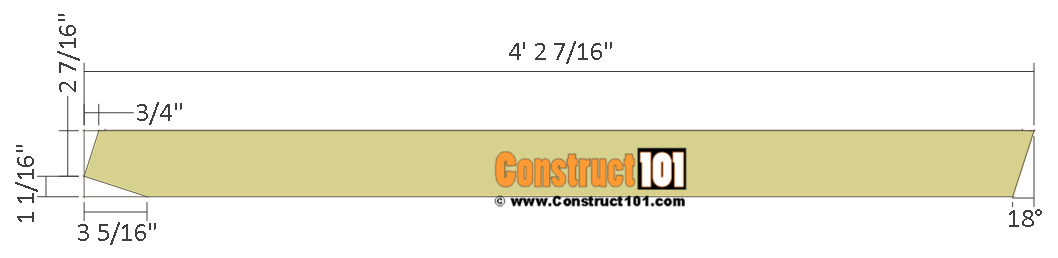
Cut twelve 2×4’s to 4′ 2 7/16″ long for the rafters. Cut the ends of the rafters as shown on illustration above.

Install the rafters as shown on illustration above. Rafters are spaced out 24″ O.C. Toenail 3 1/2″ nails through the rafters and into the wall frame.
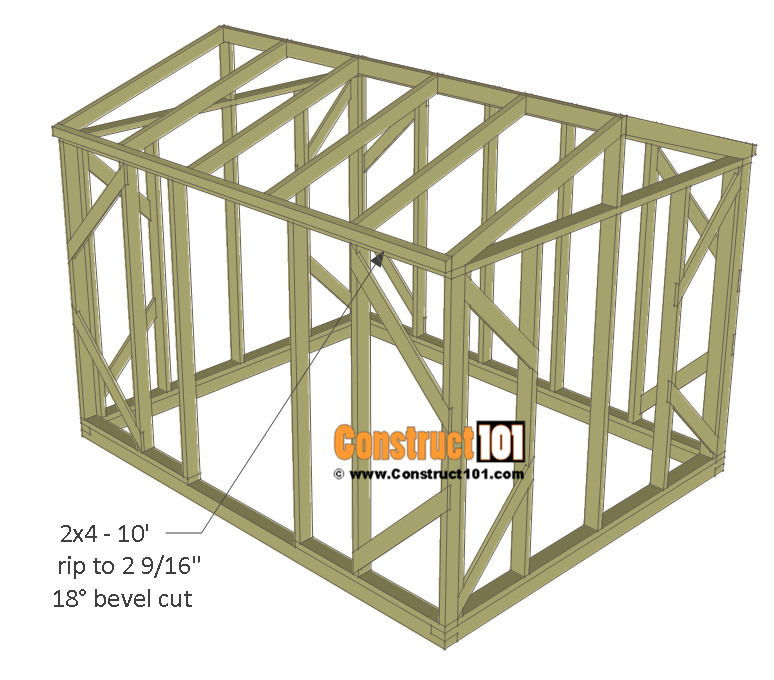
Cut two 2×4’s to 10′ long, rip the 2×4’s to 2 9/16″, cut an 18-degree bevel cut to the edge. Nail 3 1/2″ nails through the 2×4 and into the rafters.

Wire Mesh
Install the wire mesh using staples.

Trim
Cut 1×2 lumber to size and install as shown above using 1 1/2″ finishing nails.
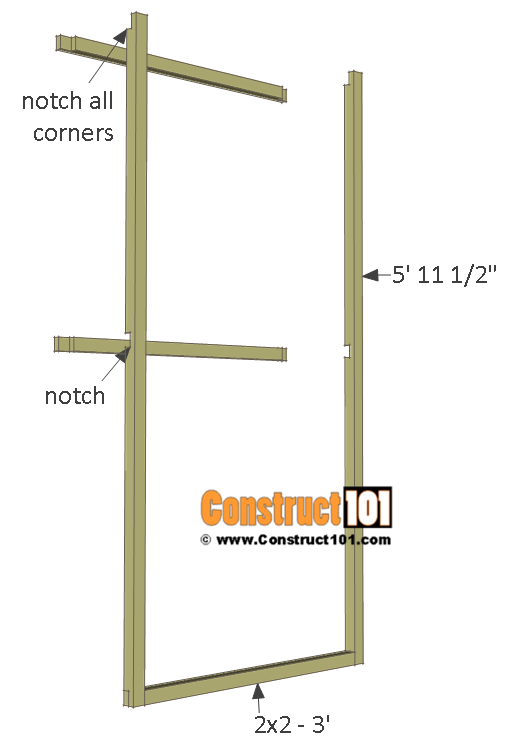
Door
The door frame is built using 2×2 lumber.
Cut two 2×2’s to 5′ 11 1/2″ long and three 2×2’s to 3′ long.
Notch and assemble as shown on illustration above using 1 1/4″ deck screws.

Cut to size wire mesh and staple to the door frame. Cut 1×2 lumber to size and install over wire mesh as shown on illustration above, secure with 1 1/2″ finishing nails. Install door hinges and handle.

Install door to chicken coop run.
Roof Deck
Cut 1/2″ plywood to size for the roof deck and install using 2″ nails.

Install roofing felt and shingles.


do i need to cover bottom to keep varmets out
I have always heard it is wise to bury wire at least 1 foot underground to prevent varmits from digging under
Put a predator apron around the base Carolina coops has a great idea
https://www.construct101.com/forums/topic/chicken-run/
What was the total cost for the project? Thanks for the plan So!
How much did you spend on this project?
I am half way done building this run. So excited! As someone who is NOT a carpenter, I love how detailed the plans are. However, I have a couple questions. I have all four walls built. How do they attach to the frame I built in the beginning? Second, when the walls get erected, how do they attach to each other? Thanks!
I had the same question! The answer: some 3 inch screws will do the trick. This answers itself once you have the four panels assembled. To attach the panels to the frame of 4x4s, just screw straight down. You’ll find that the side panels are just short enough that they will fit inside the longer panels, taking up exactly 8 feet. There are very convenient locations to screw the panels to each other. Finally, I’d use screws and not nails, so it will be easier to disassemble should you ever need to. All the best!
I am having a hard time figuring out how to download the plans????? It seems to want me to download PDF stuff, package tracking, etc….. Please help..
what would you pay someone to build this for you?
I’d marry them and feed them well. At least thats how I got roped into it.
There is an error in the plans. It concerns the 1×4 diagonal bracing. On the Front and Back walls they connect between the Corner stud and the first stud, a distance of 2 feet. On the Side walls that distance is 1 foot, 8 1/2 inches. I’m no mathmatician but if you change one side of a right angle triangle, you change the hypotonuse of the traingle. They can’t all be 3′ 2 and 11/16ths long. In fact None of them are, the offset from edge to 2 foot was not taken away.
What does this mean to the builder? Well, you’re going to cut them too long initially, then you’re going to line them up, mark them and recut. If you built square they’ll all be the same size (mine was but if you saw how my door swings you’d know that was just luck) and more importantly, they are in error on the LONG size. If you cut them all too short you’d really be in a pickle. I mentioned this on the Backyard Chickens group but can’t remember if I did here. It’s not in the comment list I’m seeing.
Also, I just got done building mine, I actually made it 20 foot long by putting two of them together, it worked well. It’s a good design and those were the only lengths that I found wrong. Oh, I cut a pare of rafters and checked em before making 24 of em but the only difference there was in a slightly out of square roofline and an under sized angle on the indicator of my rip saw. The next set of samples were good so I copied those and used the first set for scraps.
The plans are wrong in another place, the brace length for the back and front wall should be 3′ 2″ 33/64 not 3′ 2″ 11/16. I marked that out on a cad system.
I will correct the length of the 7.5′ wall when I build them
All the tape measures I’ve seen come in increments of 1/16” You don’t need to be that precise for a coop.
Nope I actually cut them to 3′ 2″ 1/2
I concur that length of the 1×4 braces indicated in the plan is incorrect. My approach was to just lay the whole 1×4 board down and mark how long they needed to be. Then cut. This is useful since if you just went with a fixed length, you will almost certainly be off by a quarter inch here and there.
A Swanson speed square is very helpful for getting the 45 degree right.
One suggestion for the chicken coop plans. IMHO, the door should open into the coop. By opening the door in, the door will tend to shoo the chickens away from the door and there is less chance of them running out of the coop.
Good tip! Thanks
Whats the easiest way to modify the roof to be a lean to?
I actually did this with mine. I built the four panels exactly as suggested. Then I went up 9 extra inches on one end, and about 4 inches in the middle using pieces of a 2 x 4, cut at a slope of 5 degrees (sketch this out yourself to be sure). Then I used two 10′ 2×4 going the length of the shed: one sitting on the 4 inch stud and one on the 9 inch stud. Finally, I used just four 8′ 2×4 rafters going the other way to cross brace. Then I used plastic 8′ x 4′ roofing panels.
It’s a little tricky to get it to work, but it ended up looking great. The best part: I used the arctan() key on my calculator for the first time since high school to figure out that 5 degree angle!
Do you know how much hardware cloth are needed for this run.?I’m ordering it online and make sure I have enough. Thank you
I figured about 4′ x 100′
I used 4 x100′. You’ll have about 20′ extra.
The door size is also too big
5′ 11 1/2 x 3 ‘ allows no clearance
I am going with 5′ 11 x 2’ 11 1/2 this will give 1/4 inch clearance all sides
Agree. I also did this.
Do you have to notch the studs or can you just attach the braces on top?
Notching the studs is a lot of work, I did it on the coop run. On the shed part I am going to save myself a lot of hard work and time and just use 2 x 4 with 45 degree angles both ends and pocket hole screws
You should notch. It’s worth it. This will allow you to attach the hardware mesh flat.
Set your circular saw to the right depth and just cut a lot of notches close to each other. Then chisel out. This was the biggest pain in the butt of the whole project. But it’s worth it.
Thank you for providing access to free plans! I am wondering if it would be easy to modify the existing chicken run plans to 8×20? Is this doable? If so, how would I go about adjusting the plans?
I’m also curious how much this cost to build. Debating between building ourselves, or just buying one. My DIY shelving project turned out way more expensive than it looks 😉
This cost me $600 in lumber, but I modified the roof and only spent $100 on roofing materials. Then maybe another $100 in screws/nails, but I bought extra. Finally, about $200 in hardware mesh (100′ x 4′). All told, closing in on $900 (March 2021).
BUT: it is worth it. looks amazing.
Building this run and having issues with the door. Built the door and made adjustments to fit. Opened and swung good took down and stretched the wire on now it will not fit the opening. Has any one else had this problem?
How do I get the printer friendly version. I just donated and I received a confirmation and link but it doesn’t work.
I got it! Thank you!
Really happy about these plans and can’t wait to build this for our chickens, but that’s ALOT of notches. Easiest way to do it? We have a circular saw, miter saw, sawzall, and table saw…but no jigsaw.
Great looking coop run that I plan on building. the only one problem I see is the material. It says to use treated lumber for the foundation when everything I have ever read said to never use treated lumber in and around any livestock including chickens. So that needs to be corrected and what would be the alternative?
I only own a circular saw but want to get either a miter saw, or a table saw for this project. Which one should I get?
I have an 8×12 shed we plan to build a 12×30 run attached to it… any chance you have plans for a run of that size?